

What’s supported
Supported actions
This connector supports:- Read Actions, including full historic backfill. Incremental reading is supported for the objects listed below. For all other objects, a full read of the Procore instance will be done per scheduled read.
- Write Actions.
- Proxy Actions, using the base URL
https://api.procore.com.
Notes
- During installation, you must provide your Procore company ID. You can find your company ID in the Procore URL after login. For example, in
https://procore.com/4283186/company/home/thumbnail, the company ID is4283186. - Use the Procore Sandbox connector when you want to test against
https://sandbox.procore.com.
Supported objects
The Procore connector supports reading from and writing to the following objects:Read objects
- action_plans/plan_types (supports incremental read)
- action_plans/verification_methods (supports incremental read)
- app_configurations
- bid_packages
- change_order/statuses
- change_order_change_reasons
- change_types
- checklist/alternative_response_sets
- checklist/item/response_sets (supports incremental read)
- checklist/list_templates (supports incremental read)
- checklist/responses
- company/projects (supports incremental read)
- configurable_field_sets
- contributing_behaviors (supports incremental read)
- contributing_conditions (supports incremental read)
- currency_configuration/exchange_rates
- custom-fields
- custom_field_definitions
- custom_field_metadata
- custom_fields_sections
- departments
- distribution_groups
- equipment_register
- estimating/bid_board_projects
- estimating/catalogs
- form_templates (supports incremental read)
- generic_tools
- generic_tools/default_types
- gps_positions (supports incremental read)
- groups
- hazards (supports incremental read)
- incidents/action_types (supports incremental read)
- incidents/affliction_types (supports incremental read)
- incidents/body_parts
- incidents/environmental_types
- incidents/harm_sources (supports incremental read)
- incidents/injury_filing_types
- incidents/severity_levels
- incidents/statuses
- incidents/work_activities (supports incremental read)
- inspection_types
- insurances
- meeting_templates
- notification-profiles
- observation_types
- offices
- operations
- people
- people/inactive
- pdf_template_configs
- payments/beneficiaries
- payments/early_pay_programs
- payments/projects
- permission_templates
- project_bid_types
- project_owner_types
- project_regions
- project_stages
- project_templates
- project_types
- projects (supports incremental read)
- programs
- recycle_bin/action_plans/plan_template_item_assignees (supports incremental read)
- recycle_bin/action_plans/plan_template_items (supports incremental read)
- recycle_bin/action_plans/plan_template_references (supports incremental read)
- recycle_bin/action_plans/plan_template_sections (supports incremental read)
- recycle_bin/action_plans/plan_template_test_record_requests (supports incremental read)
- recycle_bin/action_plans/plan_templates (supports incremental read)
- recycle_bin/checklist/list_templates
- roles
- schedule/resources
- settings/permissions
- submittal_statuses
- submittal_types
- tags
- tax_codes
- tax_types
- timecard_time_types
- timesheets/filters/crews
- trades (supports incremental read)
- uom_categories
- uoms
- users (supports incremental read)
- users/inactive
- vendors (supports incremental read)
- vendors/inactive
- webhooks/hooks
- work_classifications
- workflow_instances
- workflows/bulk_replace_requests
- workflows/tools
Write objects
- action_plans/plan_types
- action_plans/verification_methods
- app_configurations
- bim_levels
- bim_levels/batch
- bim_mint_tokens
- bim_model_revision_plans
- bim_model_revision_plans/batch
- bim_model_revision_viewpoints/batch
- bim_model_revisions
- bim_models
- bim_plans
- bim_plans/batch
- bim_view_folders
- bim_viewpoints
- bim_viewpoints/batch
- budget_view_snapshots
- change_order_change_reasons
- checklist/item/response_sets
- checklist/list_templates
- checklist/responses
- company/projects
- configurable_field_sets
- contributing_behaviors
- contributing_conditions
- contexts
- contexts/get_or_create
- coordination_issues
- coordination_issues/bulk_delete
- currency_configuration
- currency_configuration/exchange_rates
- custom-fields
- custom_field_metadata
- custom_fields_sections
- departments
- equipment_register
- equipment_register/associate
- equipment_register_categories
- equipment_register_makes
- equipment_register_models
- equipment_register/statuses
- equipment_register_types
- estimating/catalogs
- files
- form_templates
- generic_tools
- gps_positions
- groups
- hazards
- incidents/action_types
- incidents/affliction_types
- incidents/harm_sources
- incidents/work_activities
- inspection_types
- installation_requests
- insurances
- job-titles
- meeting_categories
- nested_bim_view_folders
- nested_bim_view_folders/batch
- observations/items
- offices
- people
- pdf_template_configs
- permission_templates
- payments/early_pay_programs
- programs
- project_bid_types
- project_owner_types
- project_regions
- project_stages
- project_types
- projects
- punch_item_types
- punch_items
- recycle_bin/action_plans/plan_template_item_assignees
- recycle_bin/action_plans/plan_template_items
- recycle_bin/action_plans/plan_template_references
- recycle_bin/action_plans/plan_template_sections
- recycle_bin/action_plans/plan_template_test_record_requests
- recycle_bin/action_plans/plan_templates
- recycle_bin/action_plans/plan_template_references/bulk_create
- rounding_configuration
- roles
- support_pins
- tags
- tax_codes
- tax_types
- timecard_entries
- timesheets/timesheet_to_budget_configuration
- trades
- uoms
- uploads
- users
- vendors
- webhooks/hooks
- work_classifications
- workflows/bulk_replace_requests
Example integration
For an example manifest file of a Procore integration, visit our samples repo on GitHub.Before you get started
To integrate Procore with Ampersand, you will need a Procore developer account. Once your account is created, you’ll need to create an app in Procore, configure the Ampersand redirect URI within the app, and obtain the following credentials from your app:- Client ID
- Client Secret
Creating a Procore app
Here’s how you can sign up for a Procore account:- Sign in to the Procore developer portal.
- Create a new OAuth 2.0 application.
- Add the Ampersand redirect URL:
https://api.withampersand.com/callbacks/v1/oauth. - Save the app and copy the Client ID and Client Secret.
Add your Procore app info to Ampersand
- Log in to your Ampersand Dashboard.
-
Choose the project where you want to integrate Procore.

- Navigate to the Provider Apps section.
- Select Procore from the Provider list.
-
Enter the Client ID and Client Secret obtained from Procore into the respective fields in Ampersand.
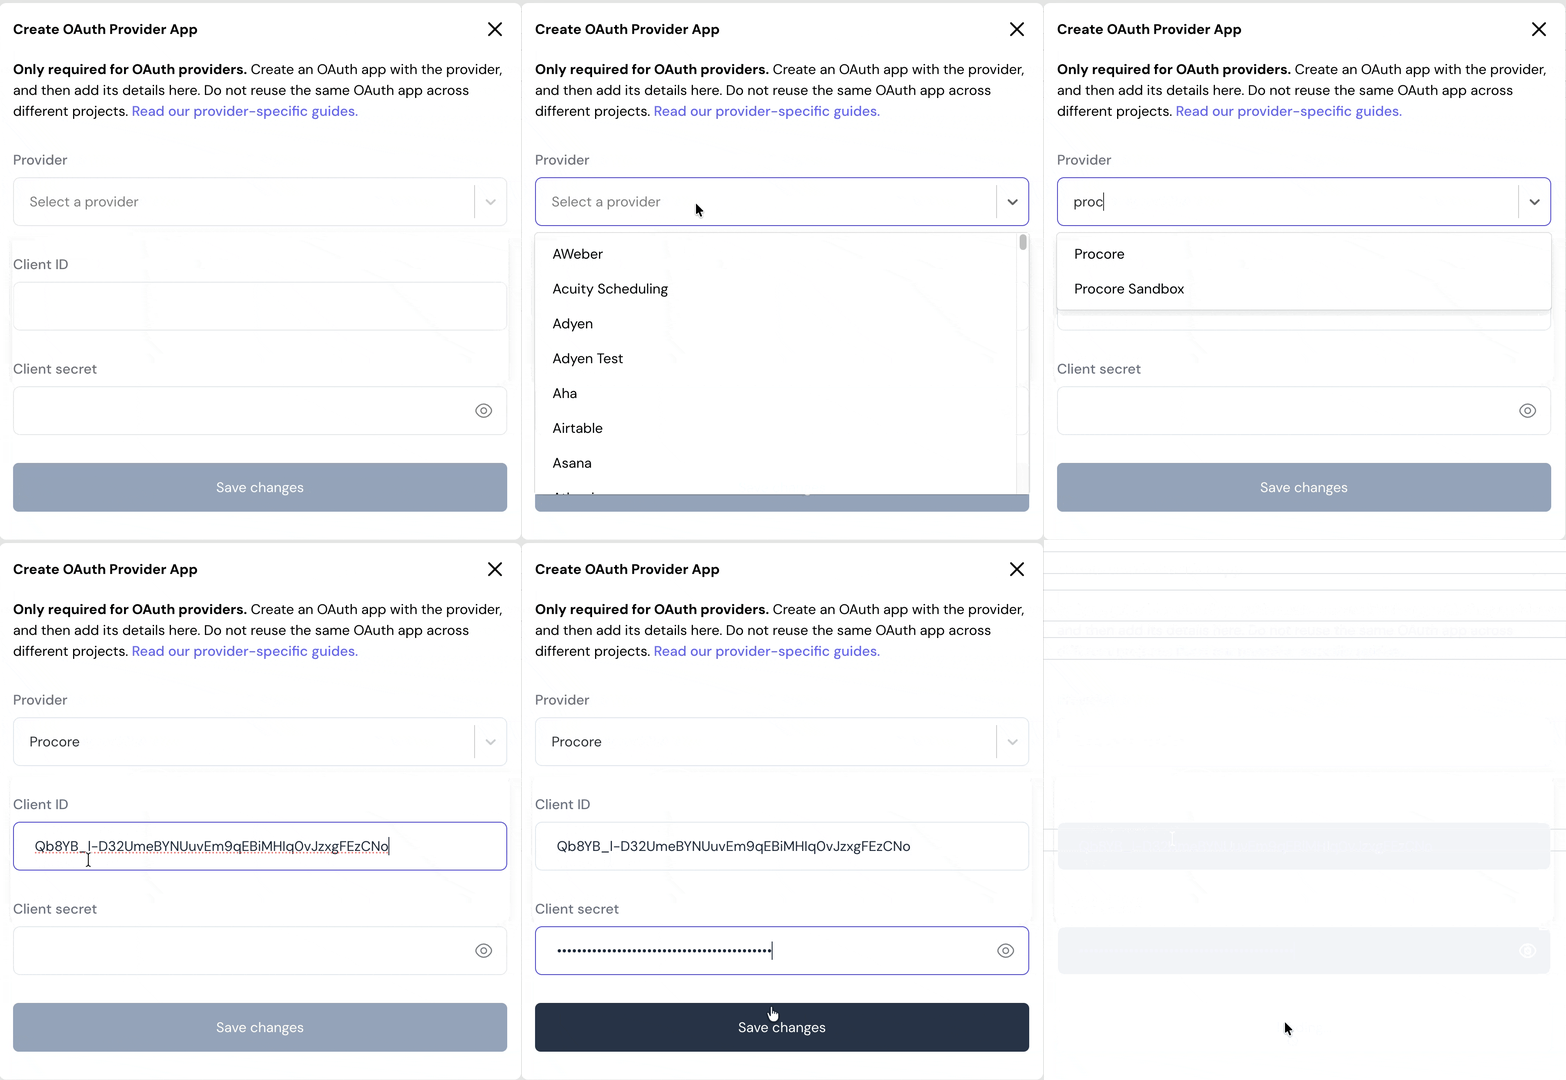
- Click Save Changes.
Using the connector
To start integrating with Procore:- Create a manifest file using the example.
- Deploy it using the amp CLI.
- If you are using Read Actions or Write Actions, create a destination.
- Embed the InstallIntegration UI component. The UI component prompts the customer for their Procore authorization and company ID (the numeric segment in their Procore URL, for example
4283186inhttps://procore.com/4283186/company/home/thumbnail). - Start using the connector.
- If your integration has Read Actions, you’ll start getting webhook messages.
- If your integration has Write Actions, you can start making API calls to our Write API.
- If your integration has Proxy Actions, you can start making Proxy API calls.