What’s Supported
Supported Actions
The Outreach connector supports:- Read Actions, including full historic backfill and incremental read for most of the supported objects. Note: Incremental reads are only supported on a per-day basis
- Write Actions.
- Proxy Actions, using the base URL
https://api.outreach.io. - Subscribe Actions.
Supported Objects
| Object | Read | Write | Subscribe |
|---|---|---|---|
| accounts | ✅ | ✅ | ✅ |
| auditLogs * | ✅ | 🚫 | 🚫 |
| calls | ✅ | ✅ | ✅ |
| callDispositions | ✅ | ✅ | 🚫 |
| callPurposes | ✅ | ✅ | 🚫 |
| complianceRequests * | ✅ | ✅ | 🚫 |
| contentCategories | ✅ | ✅ | 🚫 |
| contentCategoryMemberships | ✅ | ✅ | 🚫 |
| contentCategoryOwnerships | ✅ | ✅ | 🚫 |
| currencyTypes | ✅ | ✅ | 🚫 |
| customDuties | 🚫 | ✅ | 🚫 |
| datedConversionRates | ✅ | ✅ | 🚫 |
| duties * | ✅ | 🚫 | 🚫 |
| emailAddresses | ✅ | ✅ | 🚫 |
| events * | ✅ | 🚫 | 🚫 |
| favorites | ✅ | ✅ | 🚫 |
| import | 🚫 | 🚫 | ✅ |
| mailAliases | ✅ | 🚫 | 🚫 |
| mailboxes | ✅ | ✅ | 🚫 |
| mailings | ✅ | ✅ | ✅ |
| opportunities | ✅ | ✅ | ✅ |
| opportunityProspectRoles | ✅ | ✅ | 🚫 |
| opportunityStages | ✅ | ✅ | 🚫 |
| personas | ✅ | ✅ | 🚫 |
| phoneNumbers | ✅ | ✅ | 🚫 |
| products | ✅ | ✅ | 🚫 |
| profiles | ✅ | ✅ | 🚫 |
| prospects | ✅ | ✅ | ✅ |
| purchases | ✅ | ✅ | 🚫 |
| recipients * | ✅ | ✅ | 🚫 |
| roles | ✅ | ✅ | 🚫 |
| rulesets | ✅ | ✅ | 🚫 |
| sequences | ✅ | ✅ | ✅ |
| sequenceStates | ✅ | ✅ | ✅ |
| sequenceSteps | ✅ | ✅ | 🚫 |
| sequenceTemplates * | ✅ | ✅ | 🚫 |
| snippets | ✅ | ✅ | 🚫 |
| stages | ✅ | ✅ | 🚫 |
| tasks | ✅ | ✅ | ✅ |
| taskDispositions | ✅ | ✅ | 🚫 |
| taskPriorities | ✅ | 🚫 | 🚫 |
| taskPurposes | ✅ | ✅ | 🚫 |
| teams | ✅ | ✅ | 🚫 |
| templates | ✅ | ✅ | 🚫 |
| users | ✅ | ✅ | ✅ |
| webhooks * | ✅ | ✅ | 🚫 |
Example Integration
For an example manifest file of an Outreach integration, visit our samples repo on Github.Before You Get Started
Before creating an Outreach app, you must complete the Outreach partnership process to obtain a sandbox instance. Please ensure that you addhttps://api.withampersand.com/callbacks/v1/oauth as a callback URL for the Outreach app.
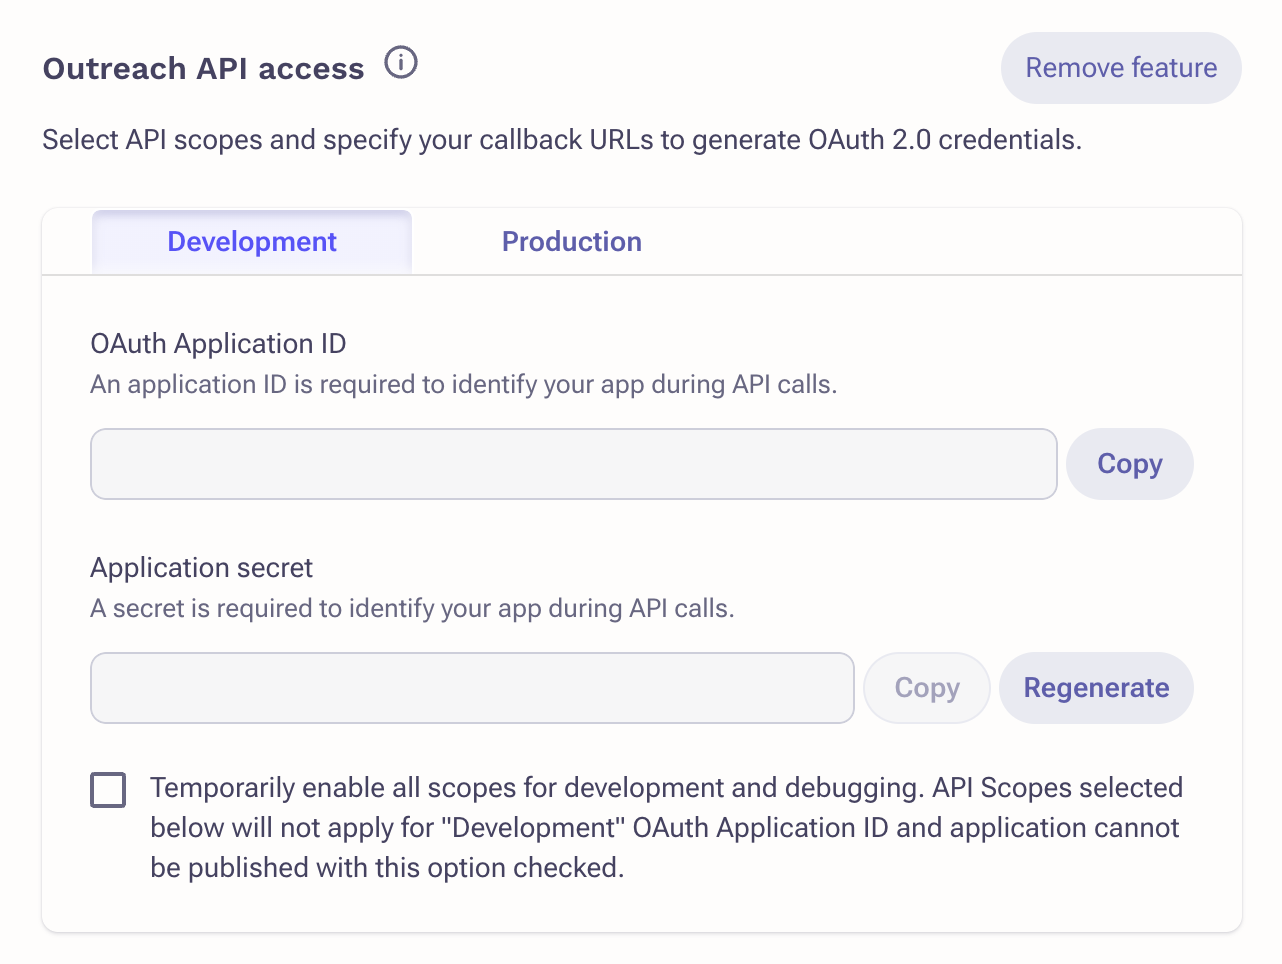
After your account is set up, you will need to acquire the following credentials from your Outreach app:
- Client ID
- Client Secret
- Scopes
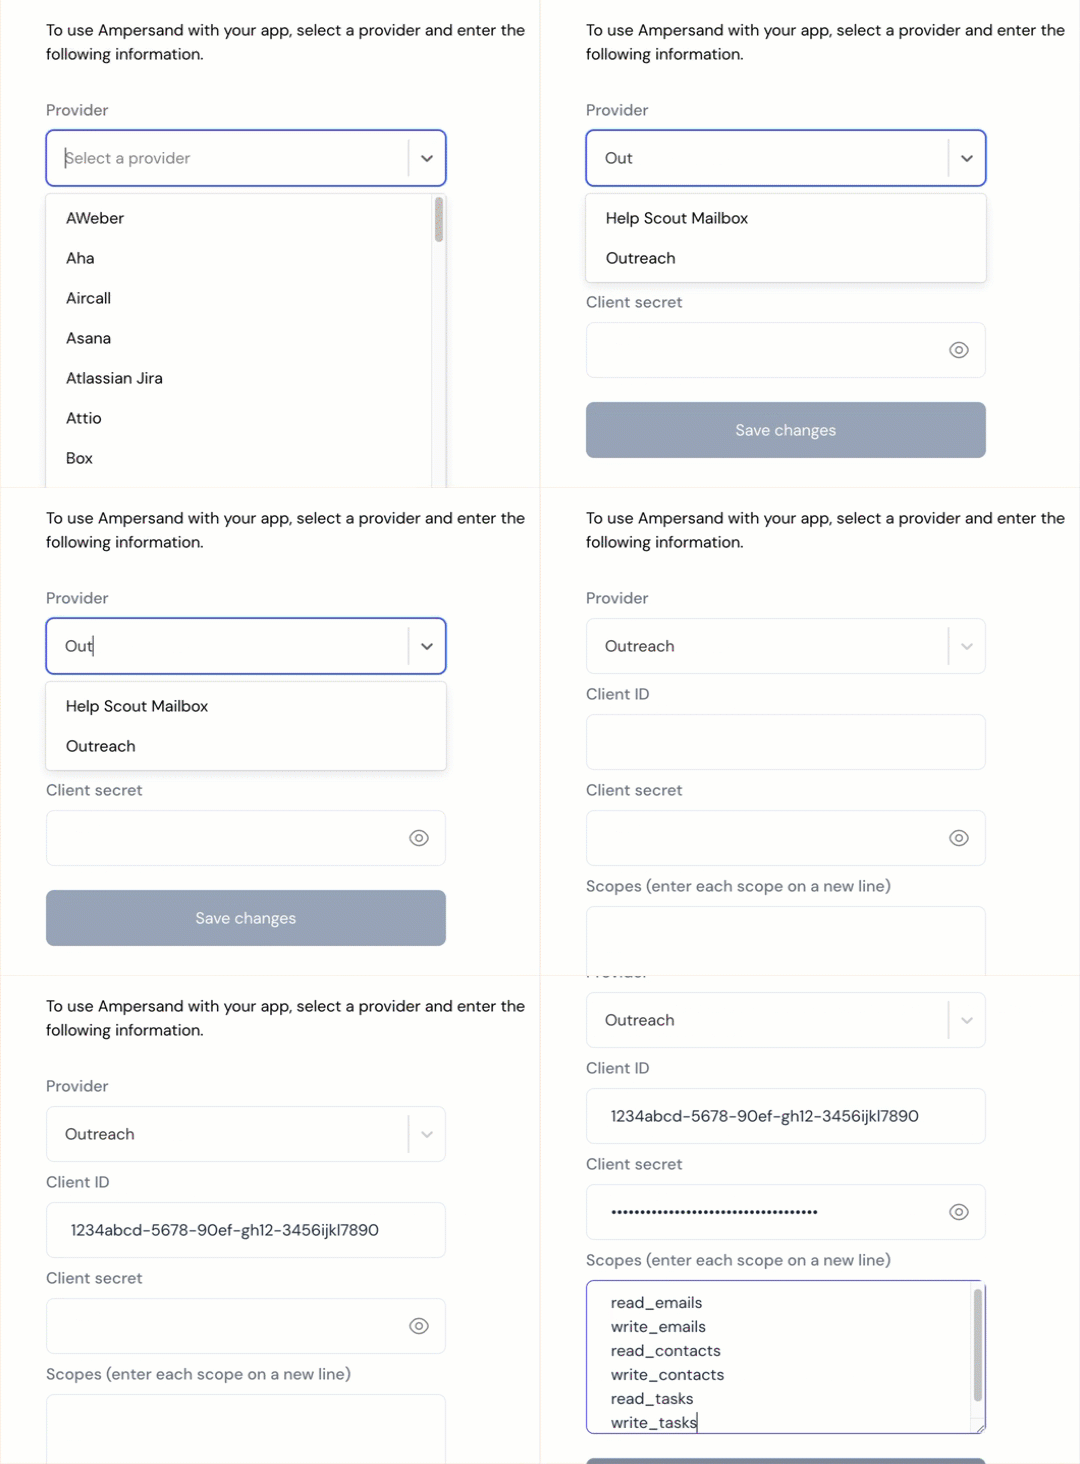
Add Outreach App Details in Ampersand
- Log in to your Ampersand Dashboard.
- Select the project where you want to add the Outreach App.
- Select Provider apps.
- Select Outreach from the Provider list.
- Enter the Outreach Application ID in the Client ID field, the Outreach Application Secret in the Client Secret field, and the requested scopes in the Permissions field.
- Enter the scopes defined for the Outreach application.
For each object that you want to read, you need to add a scope for it, for example:
accounts.all.
If your integration uses Subscribe Actions, you also need to add the webhooks.all scope.
- Click Save Changes.
Using the connector
To start integrating with Outreach:- Create a manifest file like the example.
- Deploy it using the amp CLI.
- If you are using Read Actions, create a destination.
- Embed the InstallIntegration UI component.
- Start using the connector!
- If your integration has Read Actions, you’ll start getting webhook messages.
- If your integration has Write Actions, you can start making API calls to our Write API.
- If your integration has Proxy Actions, you can start making Proxy API calls.
Publish your Outreach app
When you are ready to publish your Outreach app to the Outreach Marketplace, follow the instructions on the Outreach documentation.Limitations of development credentials
Please note that until you publish your app, there are limitations on the credentials you obtain via your Ampersand integration. While an unpublished app can be used to connect to other Outreach workspaces, such as those of your customers, Outreach will expire those credentials weekly. This means that your customers will need to re-install their integrations weekly. Refer to the Outreach documentation for more details. Even after you publish your Outreach app, be sure to select the “Production” tab and use the Application ID and Secret from that tab for your Ampersand Provider App.

