

What’s Supported
Supported Actions
The Zendesk Support connector supports:- Read Actions, including full historic backfill and incremental reads for several objects.
- Write Actions.
- Proxy Actions, using the base URL
https://{{.workspace}}.zendesk.com.
Supported Objects
The Zendesk Support connector supports incremental read for the following objects: The Zendesk Support connector supports reading from and writing to the following 48 objects:- Ticket Forms
- Ticket Fields
- Ticket Audits
- Suspended Tickets All other in alphabetical order:
- Activities
- Audit Logs
- Automations
- Bookmarks
- Brands
- Custom Roles
- Custom Statuses
- Deletion Schedules
- Group Memberships
- Groups
- Job Statuses
- Locales
- Macros
- Organization Fields
- Organization Memberships
- Organization Subscriptions
- Recipient Addresses
- Requests
- Resource Collections
- Satisfaction Ratings
- Sessions
- Sharing Agreements
- Tags
- Target Failures
- Targets
- Trigger Categories
- Triggers
- User Fields
- Views
- Workspaces
Example Integration
For an example manifest file of a Zendesk Support integration, visit our samples repo on Github.Before You Get Started
To integrate Zendesk with Ampersand, you need to Create a Zendesk Account and obtain the following credentials from your Zendesk App:- Client ID/Unique identifier
- Client Secret
Create a Zendesk Account
You need a Zendesk account to connect with Ampersand.- Follow instructions for Getting a trial account or sponsored account for development
- Ensure that your subdomain starts with the
d3v-prefix. This is crucial for ensuring that you can request a global OAuth client later, which will allow you to connect to your customer’s Zendesk instances.
Creating a Zendesk App
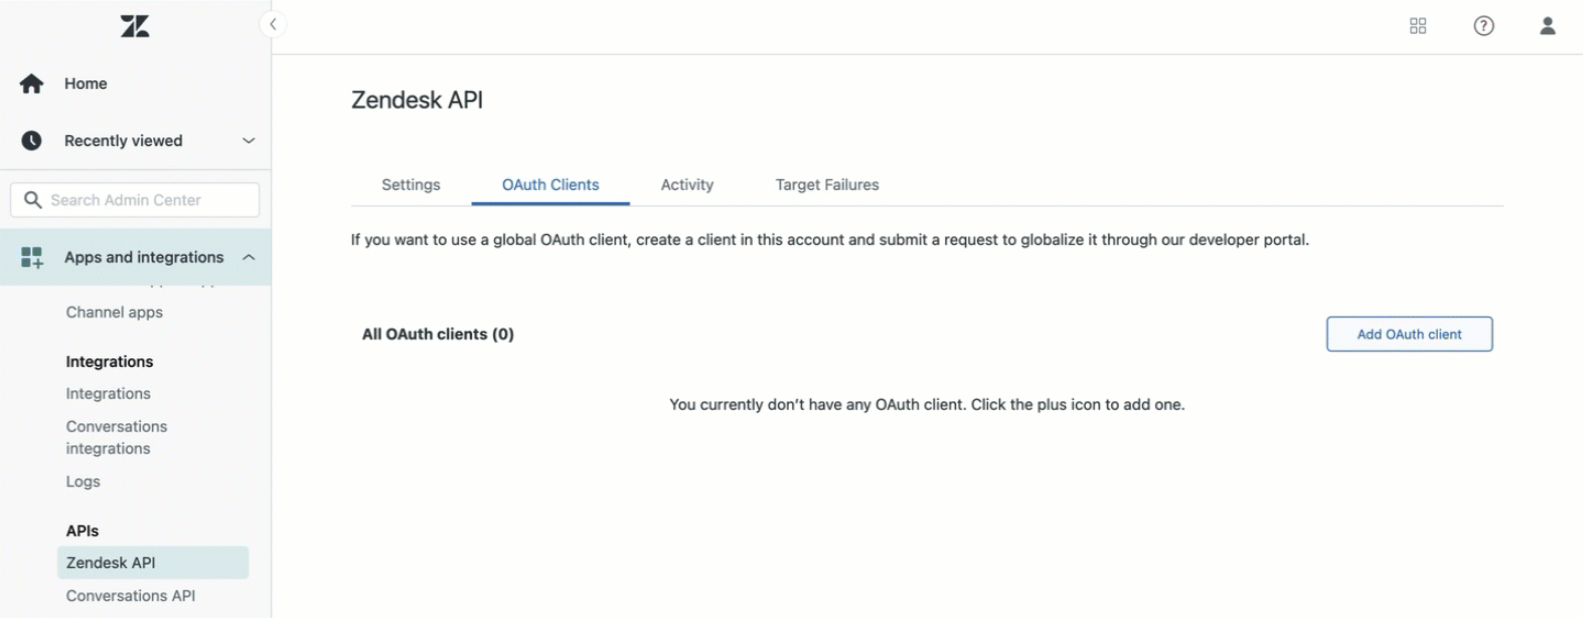
- Log in to Your Zendesk Account.
- Go to Admin Center.
- On the Admin Center page, click Apps and integrations.
- Under the APIs heading in the left navbar, click on “Zendesk API”.
- Click on OAuth Clients tab.
- On the OAuth Clients page, click Add OAuth client.
-
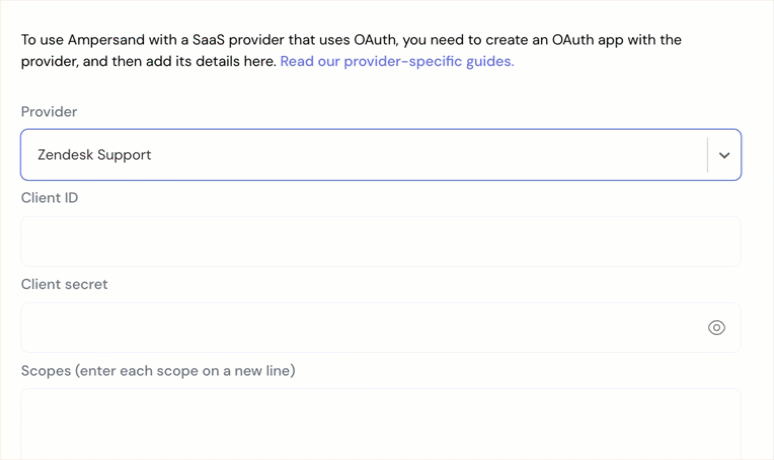
On the Add OAuth client form, enter the following details:
- Client name: The name of the OAuth client that will be shown to your users in the OAuth popup.
- Unique identifier: Ensure that you enter a name that is prefixed with
zdg-, this allows you to request a global OAuth client later. This identifier is also what you will enter in the Provider Apps tab of the Ampersand dashboard in the next step. - Client kind: Select “Confidential”
- Redirect URLs: Enter the Ampersand redirect URL:
https://api.withampersand.com/callbacks/v1/oauth
- Click Save.

Add Zendesk App Details in Ampersand
- Log in to your Ampersand Dashboard.
-
Select the project where you want to add the Zendesk App.

- Navigate to the Provider Apps section.
- Select Zendesk from the Provider list.
-
Enter the previously obtained Unique identifier in the Client ID field and the Client Secret in the Client Secret field. For a list of valid scopes, refer to the Zendesk documentation. Enter each scope in a separate line.
- Click Save Changes.
Using the connector
Please note that due to Zendesk’s API permission requirements, this integration requires credentials from a Zendesk admin.
- Create a manifest file like the example.
- Deploy it using the amp CLI.
- If you are using Read Actions, create a destination.
- Embed the InstallIntegration UI component.
- Start using the connector!
- If your integration has Read Actions, you’ll start getting webhook messages.
- If your integration has Write Actions, you can start making API calls to our Write API.
- If your integration has Proxy Actions, you can start making Proxy API calls.