

What’s Supported
Supported Actions
This connector supports:- Read Actions, including full historic backfill and incremental read.
- Proxy Actions, using the base URL
https://api.seismic.com.
Supported Objects
The Seismic connector supports reading from the following objects:- adminImpersonationSessions
- aiActivity
- aiGeneratedText
- aiGeneratedTextUserFeedback
- aiSuggestedContentProperties
- announcements
- answers
- assignments
- channels
- contentActivities
- contentAskExperts
- contentInsertInstances
- contentPages
- contentProfiles
- contentProfileAssignments
- contentProfileAssignmentsHistory
- contentProperties
- contentPropertyAssignments
- contentReviews
- contentSlideInsertInstances
- contentUsageHistory
- contentVersions
- contentViewHistory
- copilotForSalesDsrRecommendations
- copilotForSalesRecommendations
- customContents
- customContentTypeFields
- customContentTypes
- customProperties
- customPropertyAssignments
- customUserFields
- customUserFieldValues
- dailyActiveUsers
- digitalSalesRoomTemplates
- digitalSalesRoomTemplateVersions
- digitalSalesRoomViewingSessions
- digitalSalesRooms
- distributionApprovalWorkflowStepsHistory
- distributionApprovalWorkflows
- emails
- emailTemplateInstances
- emailTemplateSectionSelections
- emailTemplateStaticImages
- emailTemplateVariableValues
- entitlementRoles
- externalContentDetails
- externalUsers
- favoriteStatus
- feedbackCriteria
- followStatus
- generatedLivedocComponents
- generatedLivedocFields
- generatedLivedocOutputFormats
- generatedLivedocSlides
- generatedLivedocs
- groupManagers
- groupMembers
- groups
- indirectGroupManagers
- indirectGroupMembers
- instructorLedTrainingEventAttendance
- instructorLedTrainingEventContentAssignments
- instructorLedTrainingEventSessions
- instructorLedTrainingEvents
- interactionContexts
- interactionRecipients
- learningJourneys
- learningJourneySteps
- learningJourneyTasks
- learningProgress
- learningStatuses
- lessonTags
- lessonVersions
- lessons
- libraryContentExpertAssociations
- libraryContentVersions
- libraryContents
- livedocCustomContentDataSourceRetrieveDataRequests
- livedocDataSourceInfo
- livedocDataSourceRetrieveDataRequests
- livedocGlobalVariableRequests
- livesendCommentMentions
- livesendCommentReactions
- livesendComments
- livesendContentViewingSessions
- livesendLinkContents
- livesendLinkMeetingContents
- livesendLinkMembers
- livesendLinks
- livesendPageViews
- livesendViewingSessions
- meetingAgendaUpdates
- meetingContentPagePresentations
- meetingContentPresentations
- meetingGeneralNotesUpdates
- meetingKeywords
- meetingParticipants
- meetingQuestions
- meetingTrackers
- meetings
- microappScreenViews
- microappScreens
- notificationFrequencySettings
- notificationStatus
- pageClicks
- pageContentHistory
- paths
- pathContents
- pathTags
- postContents
- posts
- proficiencyLevels
- programAssociations
- programDates
- programItems
- programRequestDates
- programRequests
- programTaskDates
- programTasks
- publishingApprovalWorkflowAcknowledgements
- publishingApprovalWorkflowStepsHistory
- publishingApprovalWorkflows
- questions
- searchClickMatchDetails
- searchClicks
- searchFacets
- searchHistory
- searchWords
- skillAssessments
- skillProfiles
- skillProfileDetails
- skillRatings
- skillRequests
- skillReviews
- skillTags
- skillUserProfiles
- skills
- teamsites
- trainingGroupManagers
- trainingGroupMembers
- trainingGroups
- userActivity
- userEntitlementRoleAssignments
- userGroupsList
- userProperties
- userPropertyAssignments
- users
- virusScanAuditLog
- watermarks
- workspaceContentVersions
- workspaceContents
Example Integration
For an example manifest file of a Seismic integration, visit our samples repo on Github.Before You Get Started
To connect Seismic with Ampersand, you will need a Seismic Account. Once your account is created, you’ll need to configure an app in Seismic and obtain the following credentials from your app:- App ID
- Signing Secret
Create a Seismic Account
Here’s how you can sign up for a Seismic account:- Go to the Seismic Sign Up page and create an account.
- Sign up using your preferred method.
Creating a Seismic App
Follow the steps below to create a Seismic app and add the Ampersand redirect URL in the app:- Log in to your Seismic Developer Portal.
- Click Create an app.
- Enter an App Name and click Create app.
- In the Authentication section on your app, enable the Do you need authentication for your app? button.
- Enter the Ampersand redirect URL:
https://api.withampersand.com/callbacks/v1/oauthin the Oauth2 Information section. - Select the necessary scopes for your app from the Scopes section.
- Click Save Changes.
Obtain Client ID and Client Secret
- Navigate to the Basic Information tab of your app, where you’ll find the App ID.
- In the Signing Secret section, click Generate to create your client secret key.
Add Your Seismic App Info to Ampersand
- Log in to your Ampersand Dashboard.
-
Select the project where you want to create a Seismic integration.

- Select Provider apps.
- Select Seismic from the Provider list.
-
Enter the previously obtained App ID in the Client ID field and the Signing Secret in the Client Secret field.
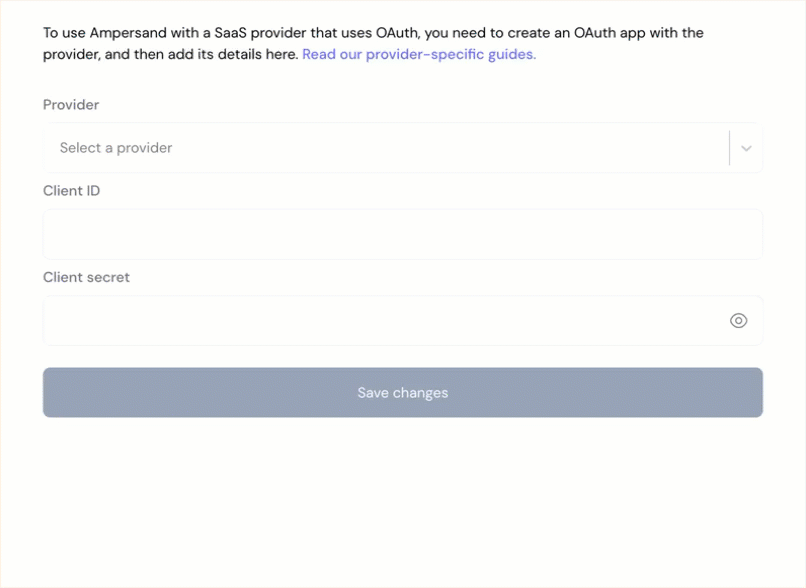
- Click Save changes.