

What’s Supported
Supported Actions
This connector supports:- Read Actions, including full historic backfill and incremental read.
- Write Actions.
- Subscribe Actions. Ampersand creates and manages the Attio webhook subscription on your behalf when the customer installs your integration — no manual webhook setup is required in the Attio UI.
- Proxy Actions, using the base URL
https://api.attio.com.
Supported Objects
The Attio connector supports the following objects:| Object | Read | Write | Subscribe |
|---|
Subscribe events
Attio uses two subscription patterns depending on the object:- Standard and custom objects (People, Companies, Users, Deals, Workspaces, and any custom object) are subscribed through Attio’s generic record events (
record.created,record.updated,record.deleted), scoped to the specific object. They support create, update, and delete events. - Core objects are subscribed through object-specific events: Notes, Tasks, and Lists support create, update, and delete; WorkspaceMembers supports create only. Note that Lists events fire on the list object itself (a list being created, updated, or deleted) — not on records being added to or removed from a list.
- Standard objects must be activated. Attio delivers
record.*events only for objects that are active in the workspace. People, Companies, and Deals are active by default; Users and Workspaces are optional standard objects that must be enabled under Workspace settings → Objects before they can be subscribed to. - Watched fields are not supported. Attio webhook payloads do not include changed-field data, so field-level update filtering (
requiredWatchFields) is not available. UsewatchFieldsAuto: allfor update events — they fire on any change to the record, and Ampersand fetches the full updated record for you. - Scopes gate webhook creation and delivery. Your Attio app must be granted read-write access to the Webhooks scope (to create the subscription) and read access to record objects (so Ampersand can fetch the changed record). Grant these under Workspace settings → Developers → [your app] → Scopes; without them, subscription creation fails with a
403.
Example integration
For an example manifest file of an Attio integration, visit our samples repo on Github.Before You Get Started
To connect Attio with Ampersand, you will need an Attio Account. Once your account is created, you’ll need to create an app in Attio and obtain the following credentials from your app:- Client ID
- Client Secret
Create an Attio Account
Here’s how you can sign up for an Attio account:- Go to the Attio Sign Up page.
- Sign up using your preferred method.
Creating an Attio App
Follow the steps below to create an Attio app and add the Ampersand redirect URL.- Log in to your Attio account.
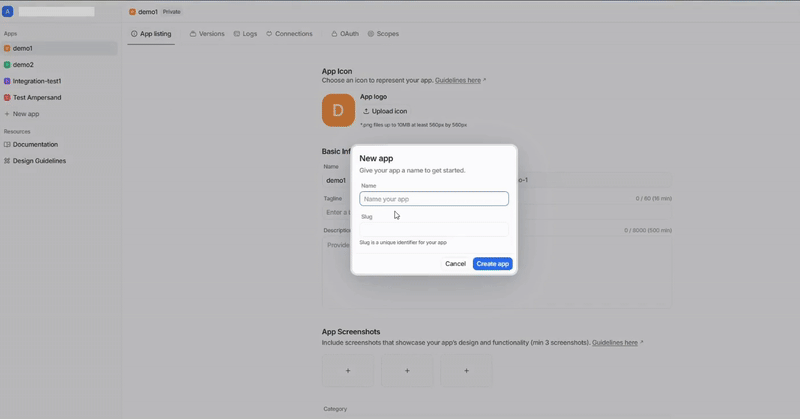
- Click on New app to open the New app dialog.
- Enter a name for the application in the name section and click Create app.
- Navigate to the OAuth section and enable OAuth switch to view the Client ID and Client Secret.
-
In the Redirect URIs section, click New redirect URI, add the Ampersand Redirect URI:
https://api.withampersand.com/callbacks/v1/oauth. - Click Configure scopes, enable the necessary scopes, and click Save changes.
Add Your Attio App Info to Ampersand
- Log in to your Ampersand Dashboard.
-
Select the project where you want to create an Attio integration.

- Select Provider Apps.
- Select Attio from the Provider list.
-
Enter the previously obtained Client ID in the Client ID field and the Client Secret in the Client Secret field.
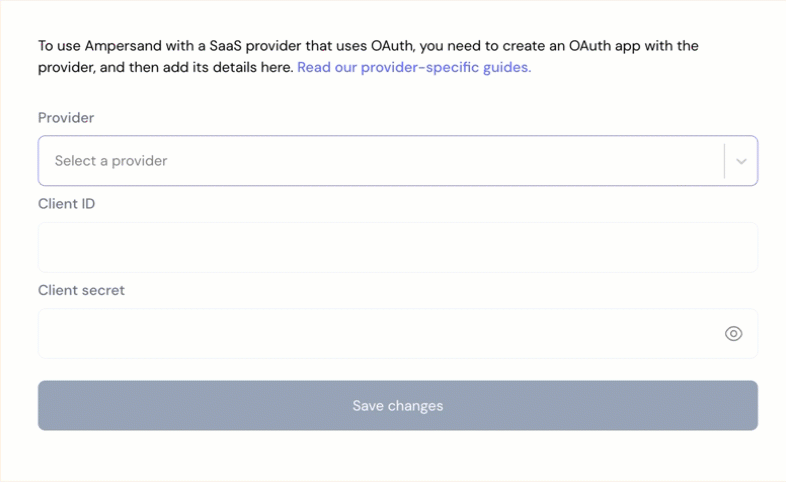
- Click Save Changes.
Using the connector
To start integrating with Attio:- Create a manifest file using the example.
- Deploy it using the amp CLI.
- If you are using Read Actions or Subscribe Actions, create a destination.
- Embed the InstallIntegration UI component.
- Start using the connector!
- If your integration has Read Actions or Subscribe Actions, you’ll start getting webhook messages.
- If your integration has Write Actions, you can start making API calls to our Write API.
- If your integration has Proxy Actions, you can start making Proxy API calls.