| Object | Read | Write | Subscribe |
|---|---|---|---|
| Account | |||
| Campaign | |||
| Case | |||
| Contact | |||
| Event | |||
| Lead | |||
| Opportunity | |||
| Product | |||
| Task | |||
| User | |||
| All other standard objects | (See the full list\*) | ||
| All custom objects |
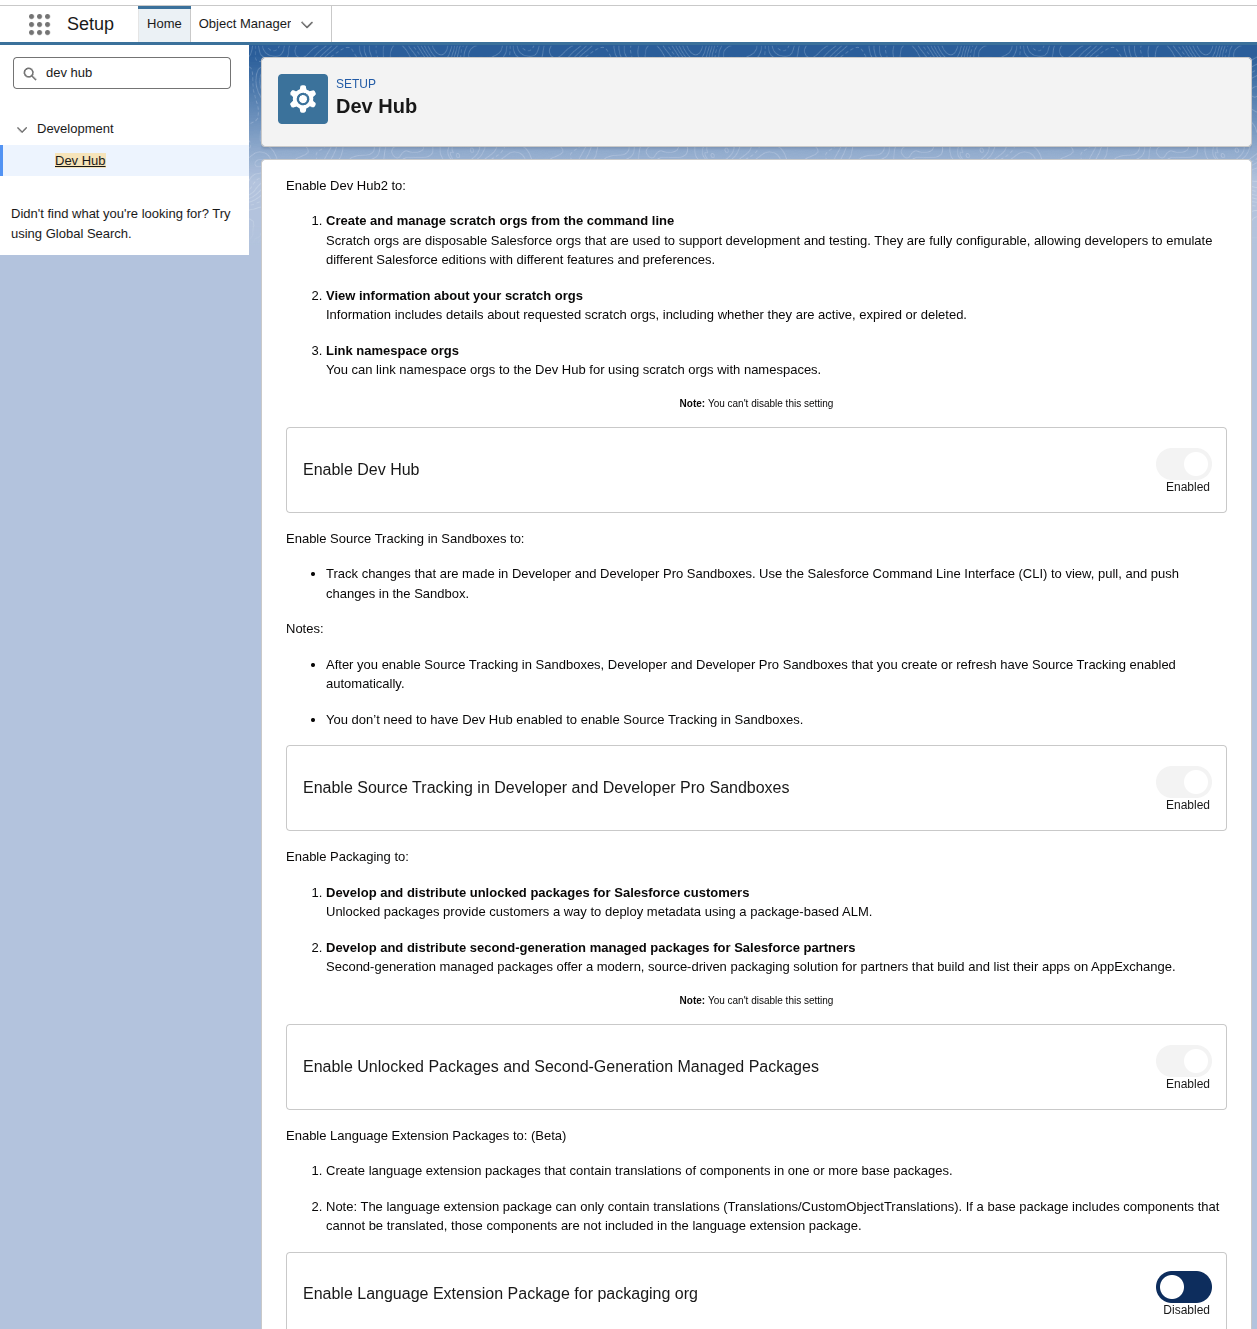 ### 2. Register a namespace
Please note that namespaces cannot be created in the Dev Hub Org you just enabled in the step above. You must use a separate Salesforce Developer Edition org (we will call this org the "Namespace Org").
1. Sign up for a free [Developer Edition org](https://developer.salesforce.com/signup).
2. Navigate to the gear icon in the top right corner and select **Setup**.
### 2. Register a namespace
Please note that namespaces cannot be created in the Dev Hub Org you just enabled in the step above. You must use a separate Salesforce Developer Edition org (we will call this org the "Namespace Org").
1. Sign up for a free [Developer Edition org](https://developer.salesforce.com/signup).
2. Navigate to the gear icon in the top right corner and select **Setup**.
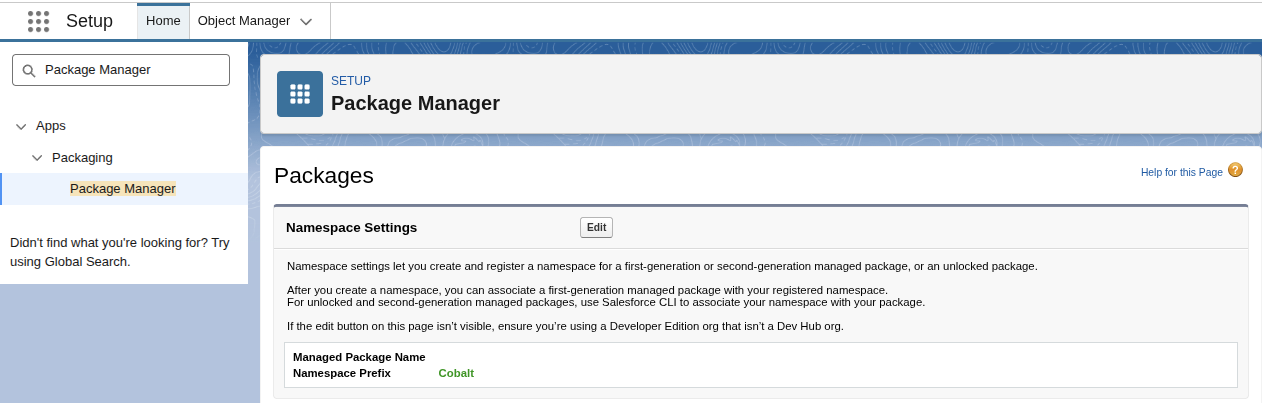
 3. In the quick search box at the top, type in **Package Manager** in the Quick Find box and select **Package Manager**. In **Namespace Settings**, click **Edit**.
4. Enter a namespace and select **Check Availability**. We recommend picking a namespace that is your product name or a shortened version of your product name.
5. When prompted to select a package to associate with this namespace, select **None**, then click **Review**.
6. Review your selections and click **Save**.
3. In the quick search box at the top, type in **Package Manager** in the Quick Find box and select **Package Manager**. In **Namespace Settings**, click **Edit**.
4. Enter a namespace and select **Check Availability**. We recommend picking a namespace that is your product name or a shortened version of your product name.
5. When prompted to select a package to associate with this namespace, select **None**, then click **Review**.
6. Review your selections and click **Save**.
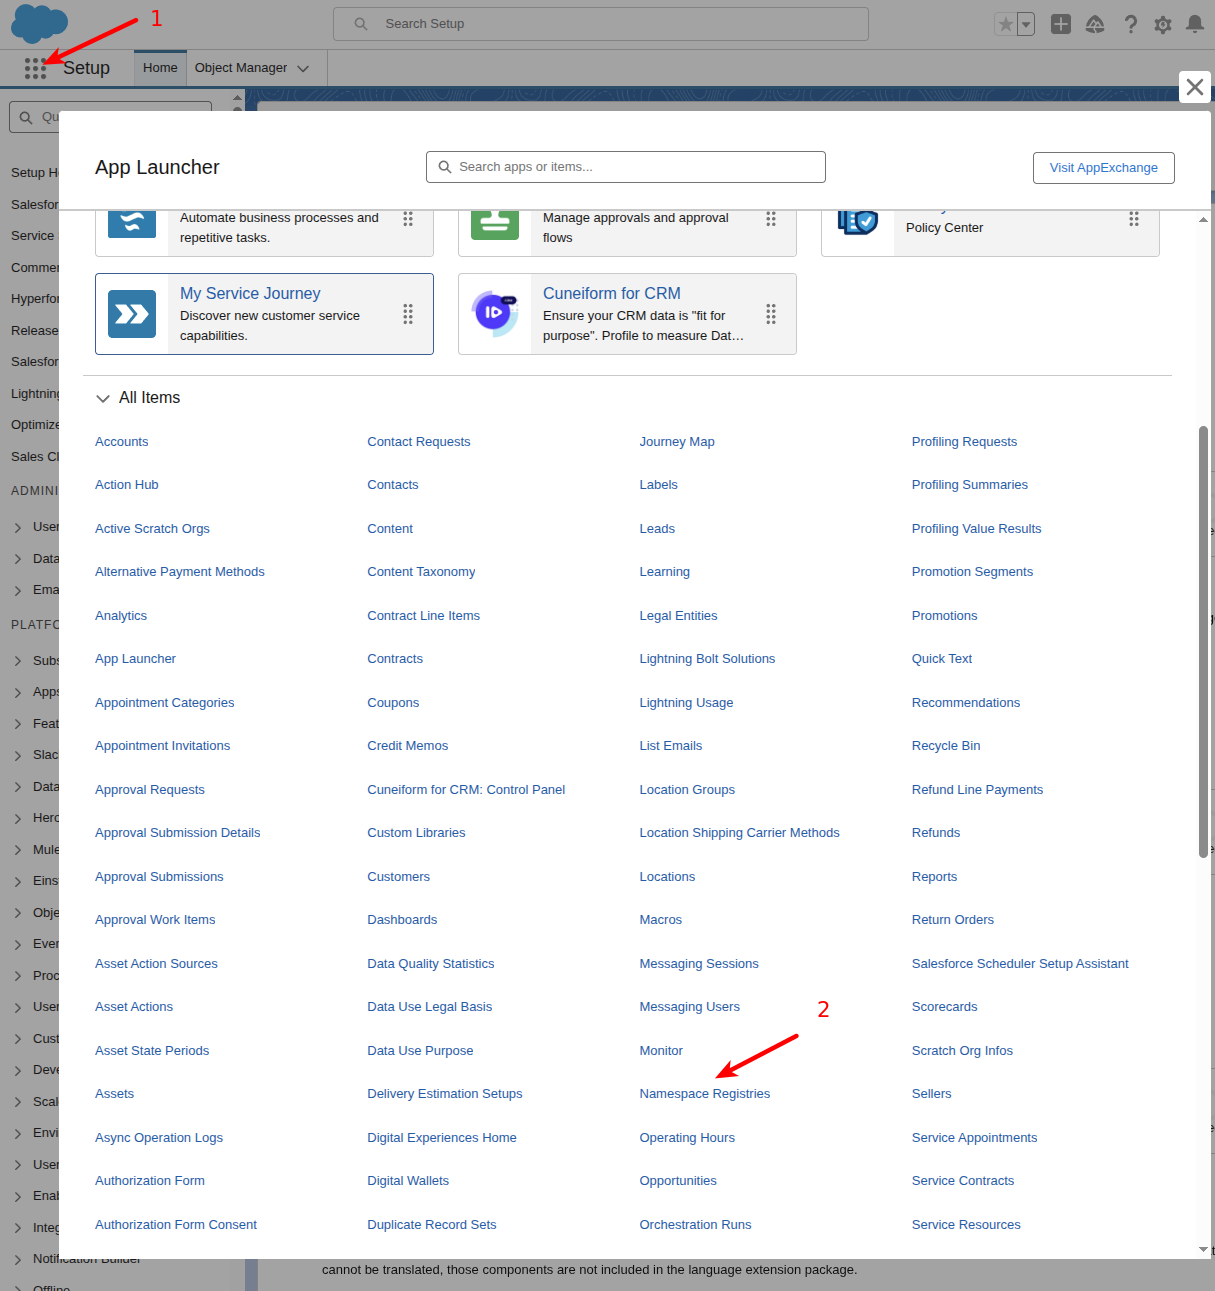
 ### 3. Link namespace to Dev Hub Org
* Log in to the Dev Hub Org from Step 1.
* Open **App Launcher** (9 dots at the top left), and search for **Namespace Registries**.
* Click **Link Namespace** on the top right.
* When prompted to authenticate, log into the Namespace Org from Step 2. If you are having trouble with this step, try again in an incognito window.
* After linking, select **All Namespace Registries** filter to view the namespace.
### 3. Link namespace to Dev Hub Org
* Log in to the Dev Hub Org from Step 1.
* Open **App Launcher** (9 dots at the top left), and search for **Namespace Registries**.
* Click **Link Namespace** on the top right.
* When prompted to authenticate, log into the Namespace Org from Step 2. If you are having trouble with this step, try again in an incognito window.
* After linking, select **All Namespace Registries** filter to view the namespace.
 ### 4. Create External Client App
In order to connect with your customer's Salesforce instances, you'll need to create a Salesforce External Client App by following the steps below:
1. Log in to your Dev Hub Org that you created above.
2. Navigate to the gear icon in the top right corner and select **Setup**.
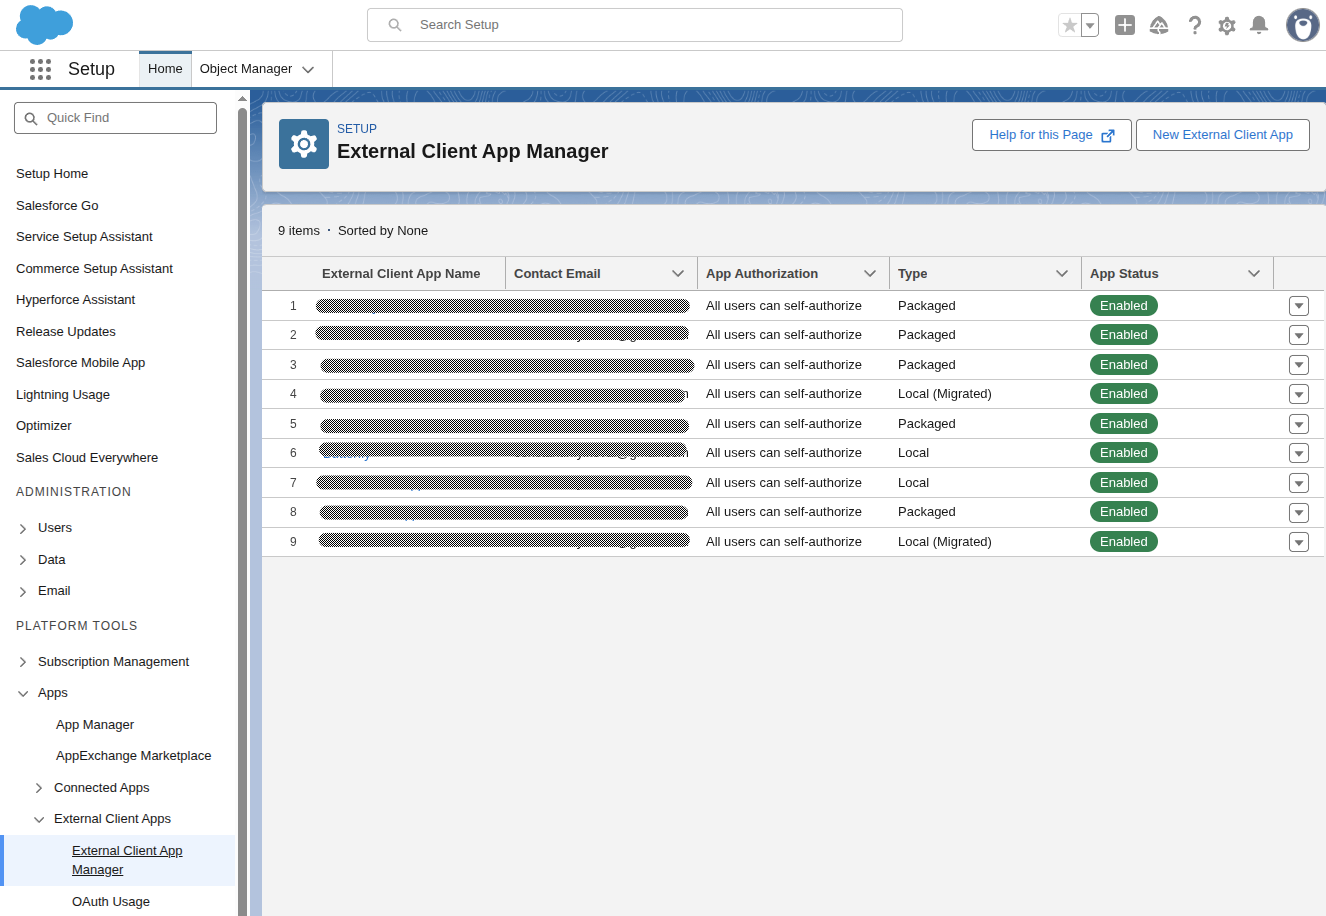
3. Search for **External Client App Manager**.
4. Click **New External Client App**.
### 4. Create External Client App
In order to connect with your customer's Salesforce instances, you'll need to create a Salesforce External Client App by following the steps below:
1. Log in to your Dev Hub Org that you created above.
2. Navigate to the gear icon in the top right corner and select **Setup**.
3. Search for **External Client App Manager**.
4. Click **New External Client App**.
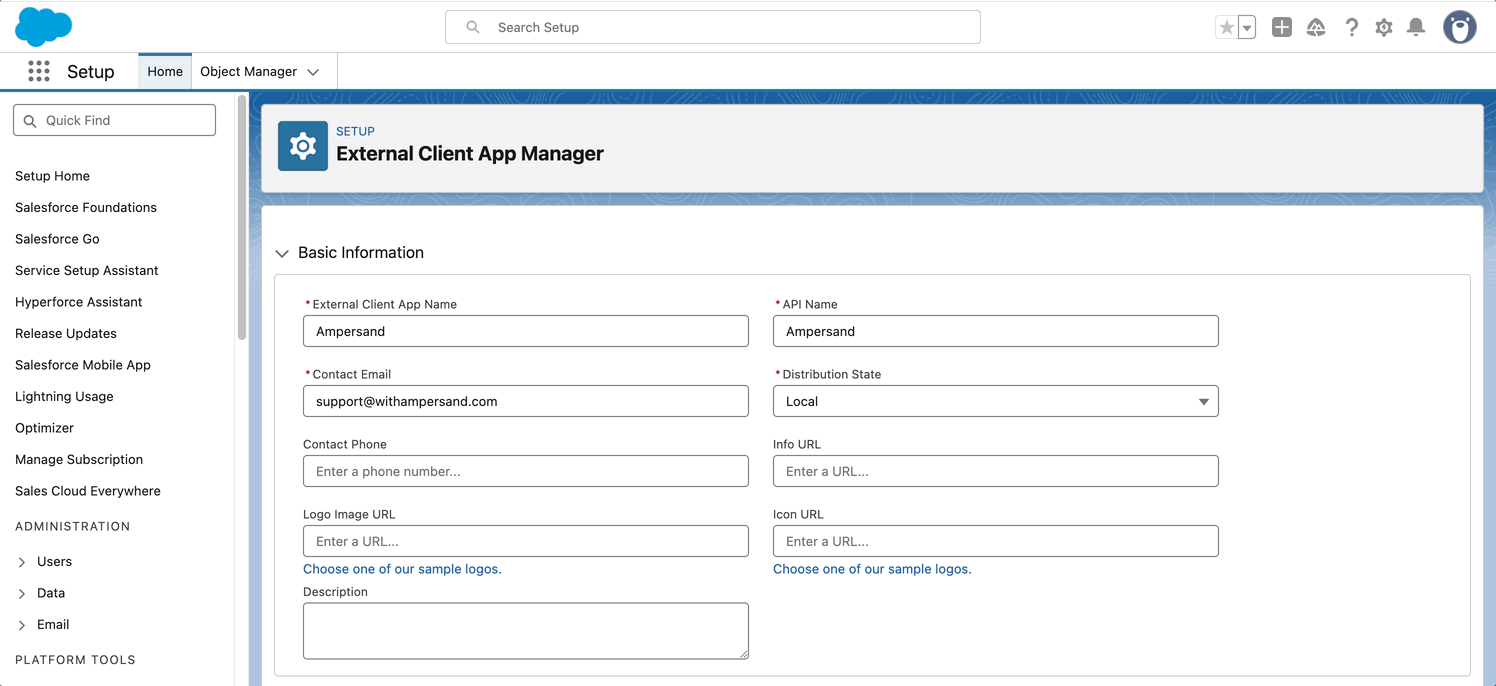
 * Enter a **name** for the External Client App. This should match your product name.
* Specify a **contact email**; this should be your support email address.
* Set **Distribution State** to **"Packaged"**.
* Enable **OAuth settings**.
* In **callback URL** put `https://api.withampersand.com/callbacks/v1/oauth`.
* Add the following **OAuth scopes** at the minimum:
* Perform requests at any time (`refresh_token`, `offline_access`)
* Manage user data via APIs (`api`)
> ✅ For more details on which OAuth scopes to include, refer to the [OAuth Tokens and Scopes](https://help.salesforce.com/s/articleView?id=sf.remoteaccess_oauth_tokens_scopes.htm\&language=en_US\&type=5) guide.
* Uncheck the box for `Require Proof Key for Code Exchange (PKCE) extension for Supported Authorization Flows`
* Check the box for `Enable Authorization Code and Credentials Flow`
* Enter a **name** for the External Client App. This should match your product name.
* Specify a **contact email**; this should be your support email address.
* Set **Distribution State** to **"Packaged"**.
* Enable **OAuth settings**.
* In **callback URL** put `https://api.withampersand.com/callbacks/v1/oauth`.
* Add the following **OAuth scopes** at the minimum:
* Perform requests at any time (`refresh_token`, `offline_access`)
* Manage user data via APIs (`api`)
> ✅ For more details on which OAuth scopes to include, refer to the [OAuth Tokens and Scopes](https://help.salesforce.com/s/articleView?id=sf.remoteaccess_oauth_tokens_scopes.htm\&language=en_US\&type=5) guide.
* Uncheck the box for `Require Proof Key for Code Exchange (PKCE) extension for Supported Authorization Flows`
* Check the box for `Enable Authorization Code and Credentials Flow`
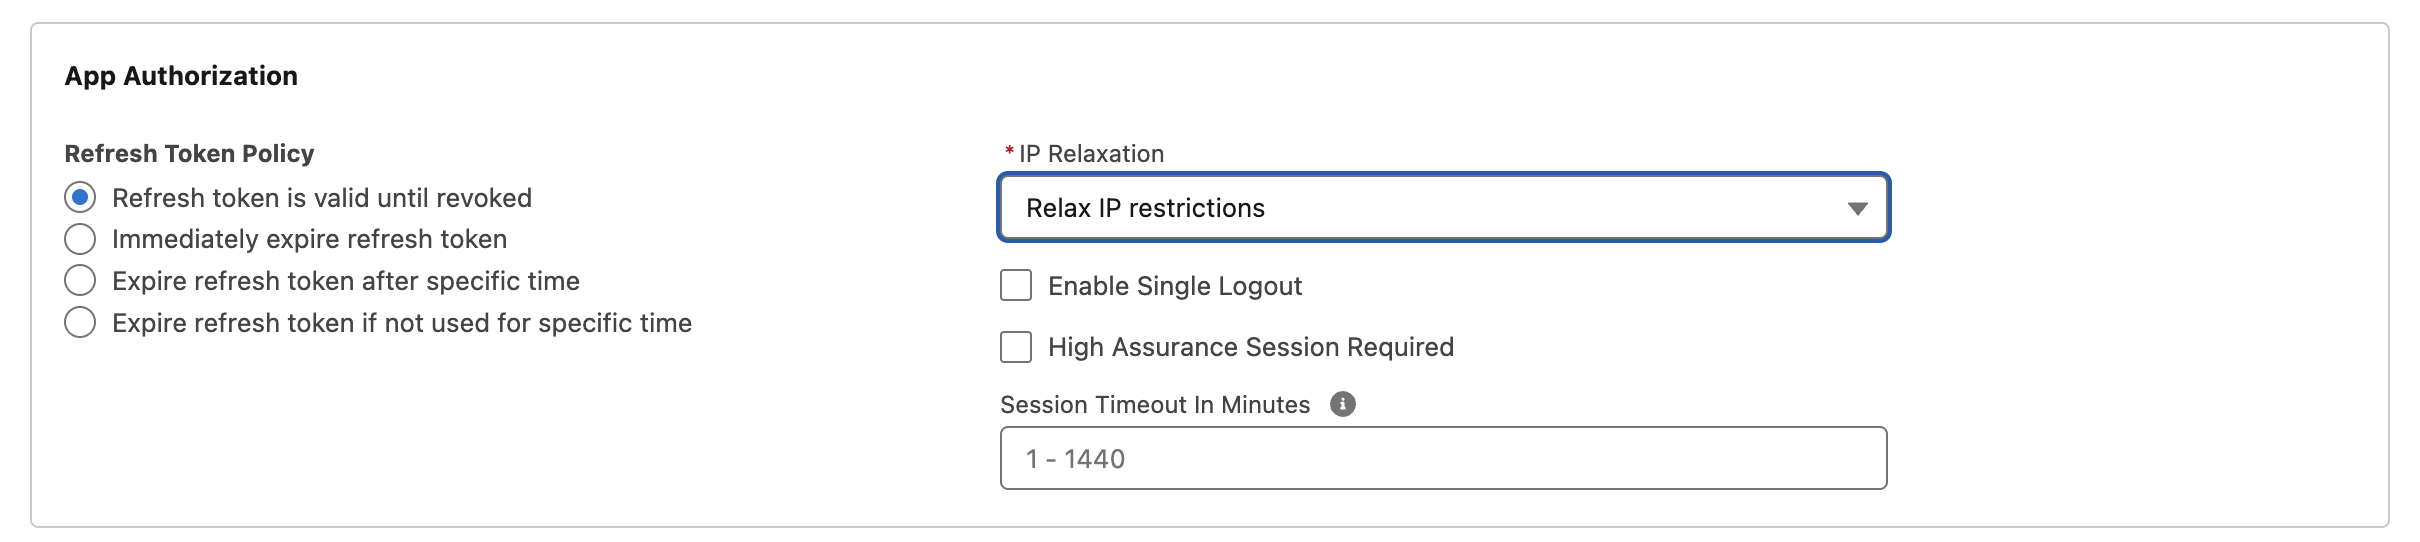
 5. Go to the Policies tab, expand “OAuth Policies”, and click the edit button. In the “App Authorization” box, make the following modifications:
* In “Refresh Token Policy”, select “Refresh token is valid until revoked”
* In “IP Relaxation”, select “Relax IP restrictions”
5. Go to the Policies tab, expand “OAuth Policies”, and click the edit button. In the “App Authorization” box, make the following modifications:
* In “Refresh Token Policy”, select “Refresh token is valid until revoked”
* In “IP Relaxation”, select “Relax IP restrictions”
 6. Go to the Settings tab, expand “OAuth Settings”. Click on “Consumer Key and Secret”.
 ### 5. Package the External Client App
In order for your External Client App to be able to make API calls to your customers' Salesforce instances, Salesforce requires that you create a package version, and have your customers install your package in their Salesforce org.
1. **Install the Salesforce CLI** using npm or [another supported method](https://developer.salesforce.com/docs/atlas.en-us.sfdx_setup.meta/sfdx_setup/sfdx_setup_install_cli.htm):
```bash theme={null}
npm install -g @salesforce/cli
```
2. **Create a Salesforce DX project.** From a new directory, generate a project:
```bash theme={null}
sf project generate --name MySalesforcePackage
```
Replace `MySalesforcePackage` with a name that fits your integration, such as your product name.
3. **Authenticate with your Dev Hub Org.** From the project directory you just created, log in to your Dev Hub Org (the org where you created the External Client App):
```bash theme={null}
sf org login web --set-default-dev-hub --alias DevHubOrg
```
A browser window will open for you to sign in.
4. **Set the namespace in the project.** Edit `sfdx-project.json` in the project root. Set the `namespace` value to the namespace you registered and linked to your Dev Hub earlier:
```json theme={null}
{
"packageDirectories": [
{
"path": "force-app",
"default": true
}
],
"namespace": "MY_NAMESPACE",
"sfdcLoginUrl": "https://login.salesforce.com",
"sourceApiVersion": "59.0"
}
```
Replace `MY_NAMESPACE` with your actual namespace prefix.
5. **Create the managed package.** Use the command below and replace these flags with actual values that are applicable to you:
* `name`: replace with your product name
* `error-notification-username`: this must match the email address of one of the users in the Dev Hub Org. For example, you can use your own email here. This is the email address that will receive notifications from Salesforce about errors in the package.
```bash theme={null}
sf package create \
--name "My Package" \
--package-type Managed \
--path force-app \
--target-dev-hub DevHubOrg \
--error-notification-username your-notification-email@company.com
```
6. **Pull External Client App metadata into the project.** Run this command to programmatically fetch the settings that you had just configured for your External Client App:
```bash theme={null}
sf project retrieve start --metadata ExternalClientApplication ExtlClntAppOauthSettings --target-org DevHubOrg
```
This creates (or updates) metadata under:
* `force-app/main/default/extlClntAppOauthSettings/`
* `force-app/main/default/externalClientApps/`
If you have several External Client Apps and only want to package one, remove the XML files for the apps you do not want in the package.
7. **Build and promote a package version.** Create a new package version (this can take several minutes). Replace `My Package` with the name you supplied in the `name` flag of the `sf package create` command above.
```bash theme={null}
sf package version create \
--package "My Package" \
--installation-key-bypass \
--wait 20 \
--code-coverage
```
When it finishes, note the **Subscriber Package Version ID** that is printed. Please note that two IDs will be printed, you want the “Subscriber Package Version ID”, not the “Package Version”.
8. Promote that version so it can be installed by customers:
```bash theme={null}
sf package version promote --package SUBSCRIBER_PACKAGE_VERSION_ID --no-prompt
```
Replace `SUBSCRIBER_PACKAGE_VERSION_ID` with the ID from the previous step.
### 6. Build the Package Install URL
1. **Build the package install URL.** Use the Subscriber Package Version ID from Step 7 above to build the install URL for your package.
For production orgs:
```text theme={null}
https://login.salesforce.com/packaging/installPackage.apexp?p0=SUBSCRIBER_PACKAGE_VERSION_ID
```
For sandbox orgs:
```text theme={null}
https://test.salesforce.com/packaging/installPackage.apexp?p0=SUBSCRIBER_PACKAGE_VERSION_ID
```
2. **Ensure customers install the package**
*If you are using `@amp-labs/react` **v2.14.1** or above*:
Once you create the Provider App with the package install URL (in the next step), the UI library will automatically prompt your user to install the package on their Salesforce instance.
### 5. Package the External Client App
In order for your External Client App to be able to make API calls to your customers' Salesforce instances, Salesforce requires that you create a package version, and have your customers install your package in their Salesforce org.
1. **Install the Salesforce CLI** using npm or [another supported method](https://developer.salesforce.com/docs/atlas.en-us.sfdx_setup.meta/sfdx_setup/sfdx_setup_install_cli.htm):
```bash theme={null}
npm install -g @salesforce/cli
```
2. **Create a Salesforce DX project.** From a new directory, generate a project:
```bash theme={null}
sf project generate --name MySalesforcePackage
```
Replace `MySalesforcePackage` with a name that fits your integration, such as your product name.
3. **Authenticate with your Dev Hub Org.** From the project directory you just created, log in to your Dev Hub Org (the org where you created the External Client App):
```bash theme={null}
sf org login web --set-default-dev-hub --alias DevHubOrg
```
A browser window will open for you to sign in.
4. **Set the namespace in the project.** Edit `sfdx-project.json` in the project root. Set the `namespace` value to the namespace you registered and linked to your Dev Hub earlier:
```json theme={null}
{
"packageDirectories": [
{
"path": "force-app",
"default": true
}
],
"namespace": "MY_NAMESPACE",
"sfdcLoginUrl": "https://login.salesforce.com",
"sourceApiVersion": "59.0"
}
```
Replace `MY_NAMESPACE` with your actual namespace prefix.
5. **Create the managed package.** Use the command below and replace these flags with actual values that are applicable to you:
* `name`: replace with your product name
* `error-notification-username`: this must match the email address of one of the users in the Dev Hub Org. For example, you can use your own email here. This is the email address that will receive notifications from Salesforce about errors in the package.
```bash theme={null}
sf package create \
--name "My Package" \
--package-type Managed \
--path force-app \
--target-dev-hub DevHubOrg \
--error-notification-username your-notification-email@company.com
```
6. **Pull External Client App metadata into the project.** Run this command to programmatically fetch the settings that you had just configured for your External Client App:
```bash theme={null}
sf project retrieve start --metadata ExternalClientApplication ExtlClntAppOauthSettings --target-org DevHubOrg
```
This creates (or updates) metadata under:
* `force-app/main/default/extlClntAppOauthSettings/`
* `force-app/main/default/externalClientApps/`
If you have several External Client Apps and only want to package one, remove the XML files for the apps you do not want in the package.
7. **Build and promote a package version.** Create a new package version (this can take several minutes). Replace `My Package` with the name you supplied in the `name` flag of the `sf package create` command above.
```bash theme={null}
sf package version create \
--package "My Package" \
--installation-key-bypass \
--wait 20 \
--code-coverage
```
When it finishes, note the **Subscriber Package Version ID** that is printed. Please note that two IDs will be printed, you want the “Subscriber Package Version ID”, not the “Package Version”.
8. Promote that version so it can be installed by customers:
```bash theme={null}
sf package version promote --package SUBSCRIBER_PACKAGE_VERSION_ID --no-prompt
```
Replace `SUBSCRIBER_PACKAGE_VERSION_ID` with the ID from the previous step.
### 6. Build the Package Install URL
1. **Build the package install URL.** Use the Subscriber Package Version ID from Step 7 above to build the install URL for your package.
For production orgs:
```text theme={null}
https://login.salesforce.com/packaging/installPackage.apexp?p0=SUBSCRIBER_PACKAGE_VERSION_ID
```
For sandbox orgs:
```text theme={null}
https://test.salesforce.com/packaging/installPackage.apexp?p0=SUBSCRIBER_PACKAGE_VERSION_ID
```
2. **Ensure customers install the package**
*If you are using `@amp-labs/react` **v2.14.1** or above*:
Once you create the Provider App with the package install URL (in the next step), the UI library will automatically prompt your user to install the package on their Salesforce instance.
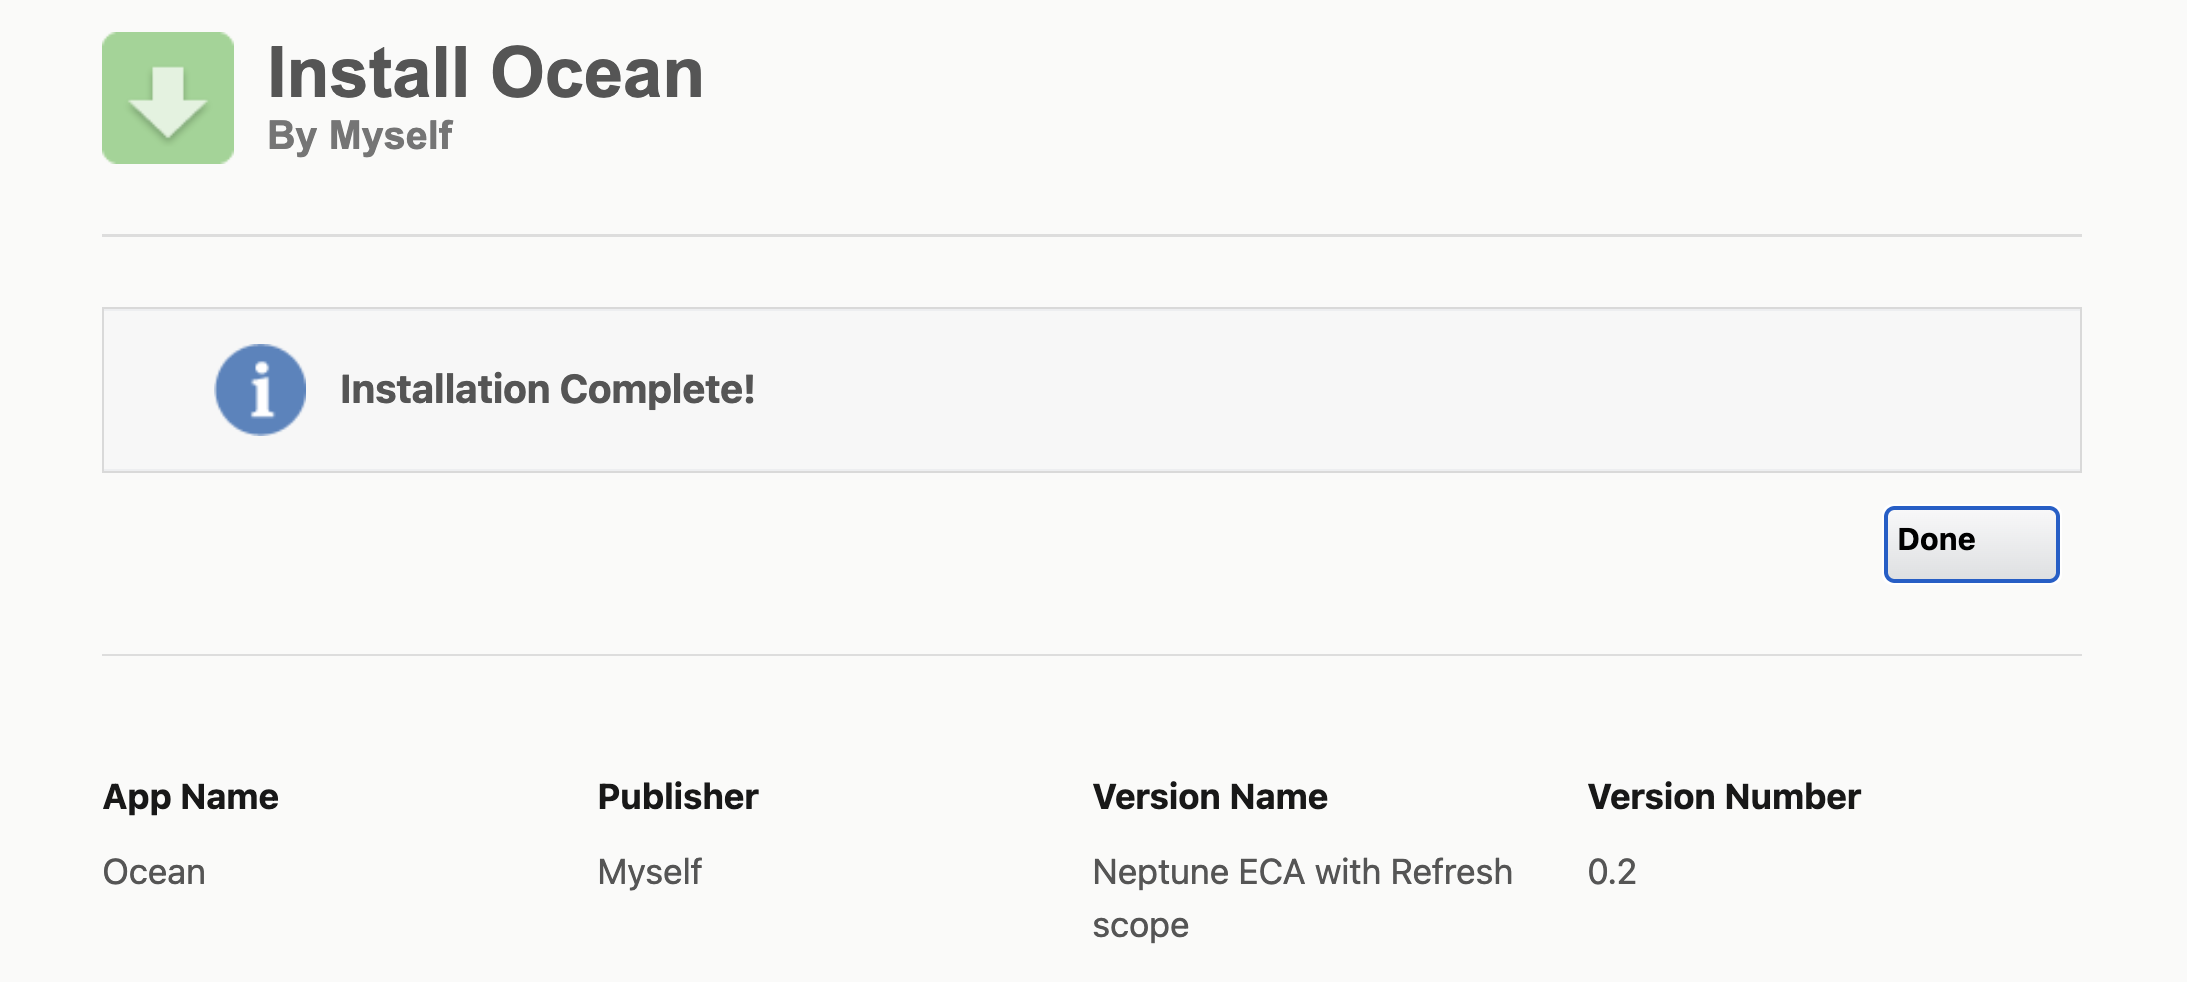
 Clicking on **Install Salesforce Package** will open up a new tab that has the Salesforce UI for them to install the package. Instruct your customers to go to the package install URL and click "Install for All Users".
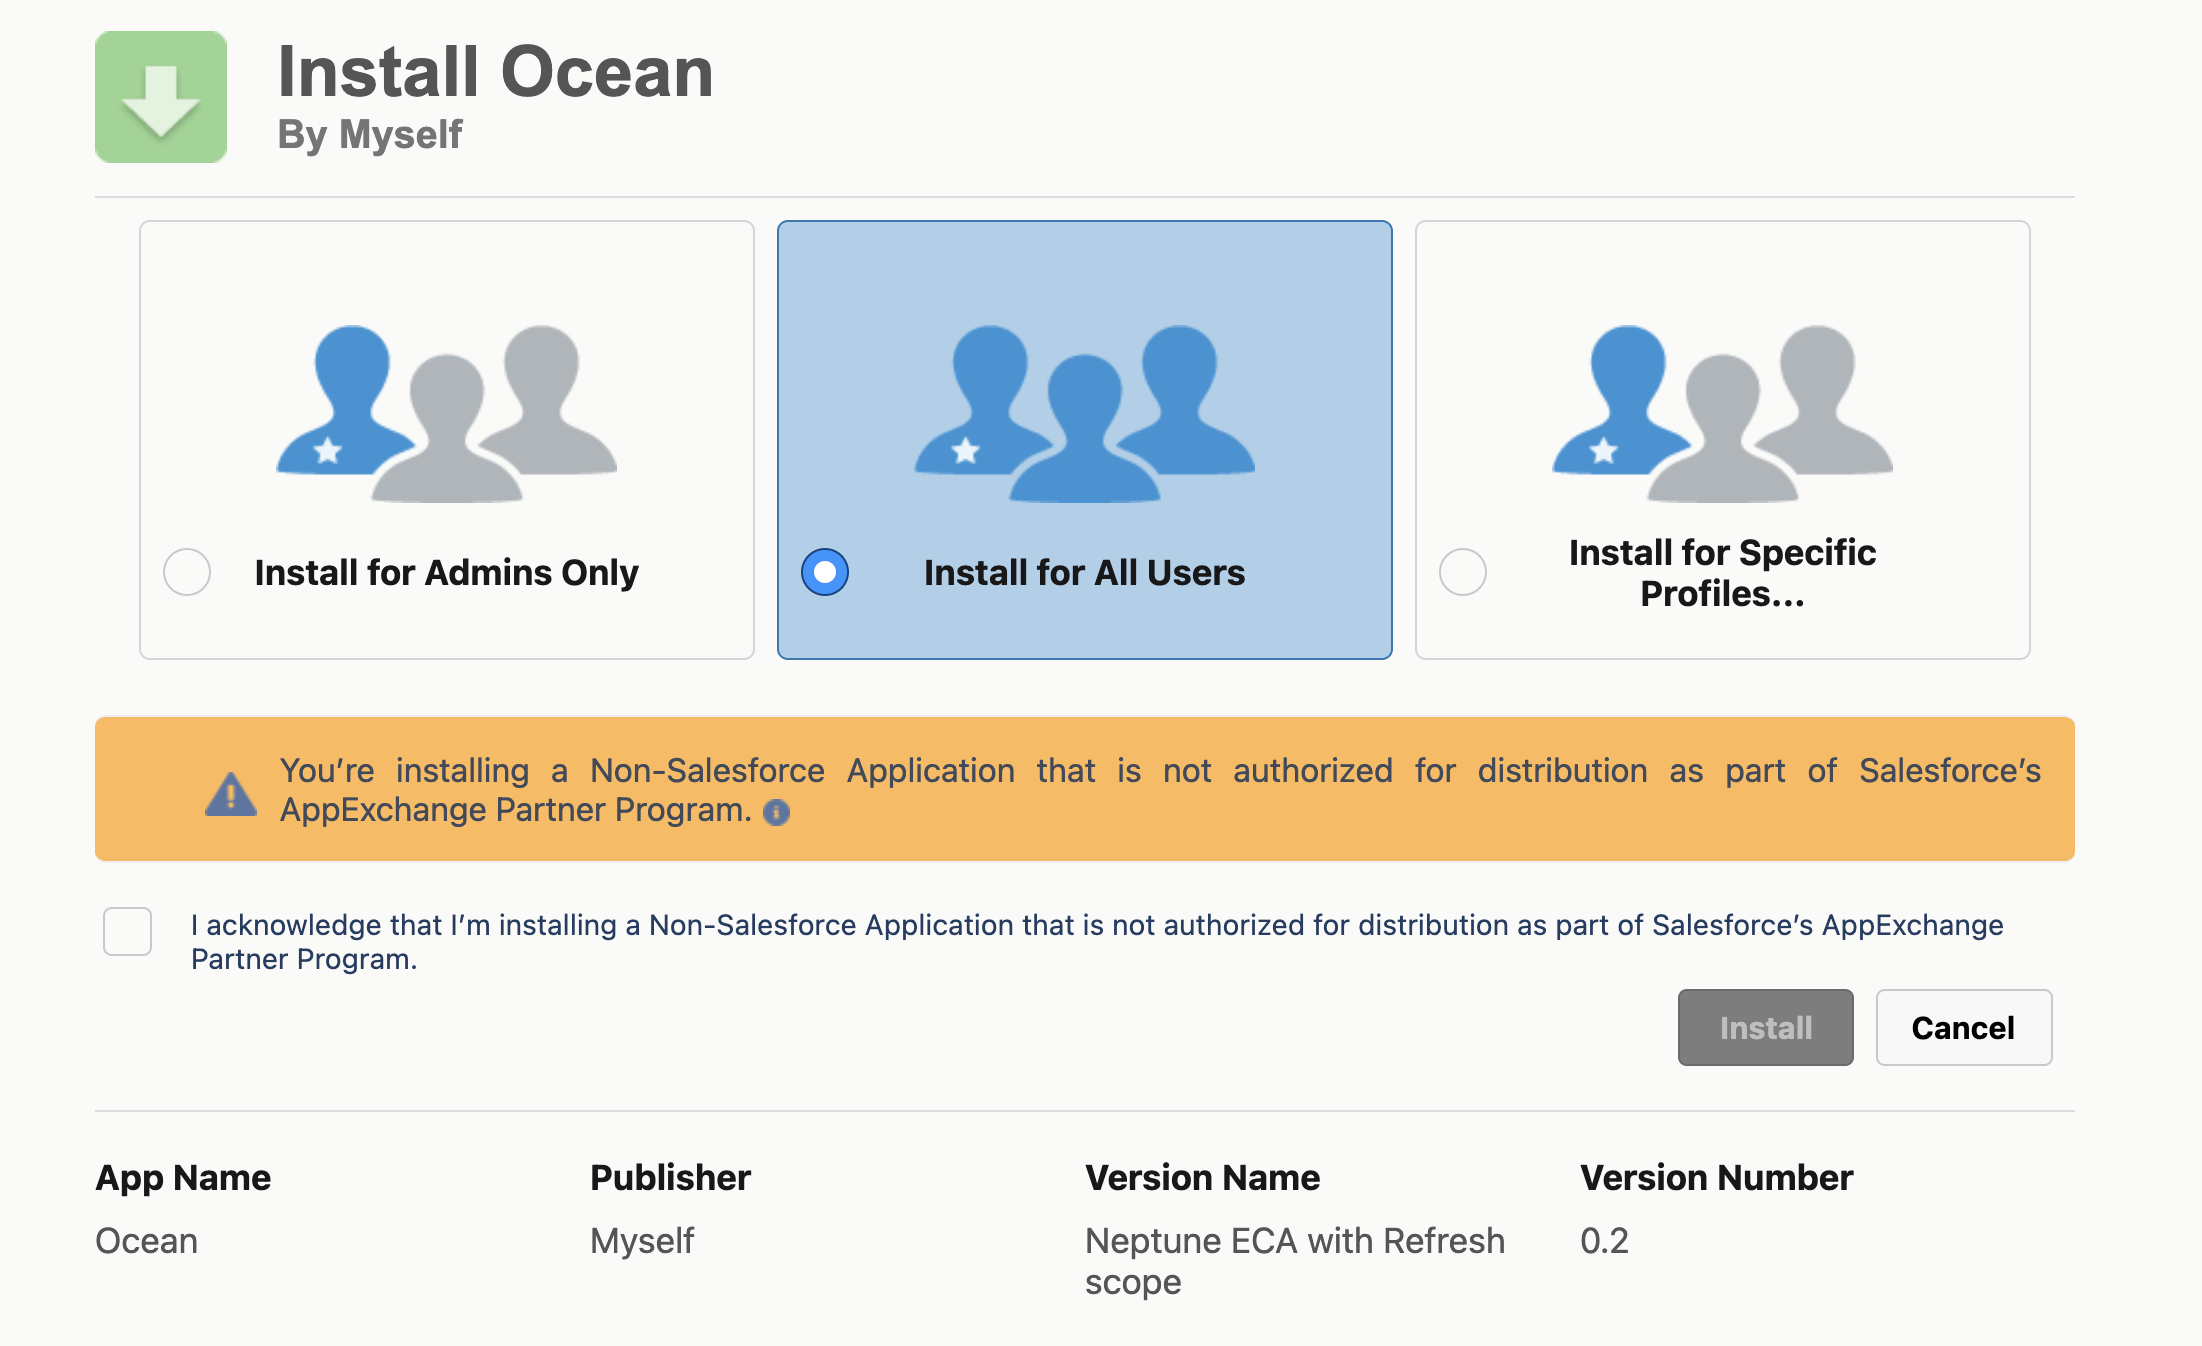 They should see a screen like this after they are successful.
 *If you are using `@amp-labs/react` versions below **2.14.1**:*
The UI library will not prompt your users to install the package, you must independently share the Package Install URL with them, and they must complete the installation process **before** they connect their Salesforce using the Ampersand UI components.
### 7. Create Provider App in Ampersand
1. Log in to your [Ampersand Dashboard](https://dashboard.withampersand.com).
2. Select the project where you want to create a Salesforce integration.
*If you are using `@amp-labs/react` versions below **2.14.1**:*
The UI library will not prompt your users to install the package, you must independently share the Package Install URL with them, and they must complete the installation process **before** they connect their Salesforce using the Ampersand UI components.
### 7. Create Provider App in Ampersand
1. Log in to your [Ampersand Dashboard](https://dashboard.withampersand.com).
2. Select the project where you want to create a Salesforce integration.
 3. Select **Provider apps**.
4. Select *Salesforce* from the **Provider** list.
5. Enter the following information:
* *Client ID*: enter the Consumer Key for the External Client App, obtained from [Step 4. Create External Client App](#4-create-external-client-app).
* *Client Secret*: enter the Consumer Secret for the External Client App, obtained from [Step 4. Create External Client App](#4-create-external-client-app)
* *Package Install URL*: enter the Package Install URL, obtained from [Step 6. Build the Package Install URL](#6-build-the-package-install-url)
## Migrating Connected App to External Client App
Salesforce no longer supports the creation of new Connected Apps. If you had previously created a Connected App to be used for Ampersand integrations, it will continue to work for your existing and new customers as long as their user profile has the `Approve Uninstalled Connected Apps` or `Use Any API Client` permissions. See [Salesforce customer guide](/customer-guides/salesforce#1-view-and-edit-permissions-for-profile) for details.
Whenever you would like to, you can follow these steps to migrate a Connected App to an External Client App:
1. Open Salesforce **Setup** and search for **Manage Connected Apps** and select the Connected App that you want to convert. Click **Migrate To External Client Application**.
3. Select **Provider apps**.
4. Select *Salesforce* from the **Provider** list.
5. Enter the following information:
* *Client ID*: enter the Consumer Key for the External Client App, obtained from [Step 4. Create External Client App](#4-create-external-client-app).
* *Client Secret*: enter the Consumer Secret for the External Client App, obtained from [Step 4. Create External Client App](#4-create-external-client-app)
* *Package Install URL*: enter the Package Install URL, obtained from [Step 6. Build the Package Install URL](#6-build-the-package-install-url)
## Migrating Connected App to External Client App
Salesforce no longer supports the creation of new Connected Apps. If you had previously created a Connected App to be used for Ampersand integrations, it will continue to work for your existing and new customers as long as their user profile has the `Approve Uninstalled Connected Apps` or `Use Any API Client` permissions. See [Salesforce customer guide](/customer-guides/salesforce#1-view-and-edit-permissions-for-profile) for details.
Whenever you would like to, you can follow these steps to migrate a Connected App to an External Client App:
1. Open Salesforce **Setup** and search for **Manage Connected Apps** and select the Connected App that you want to convert. Click **Migrate To External Client Application**.
 2. Check both required checkboxes to confirm migration.
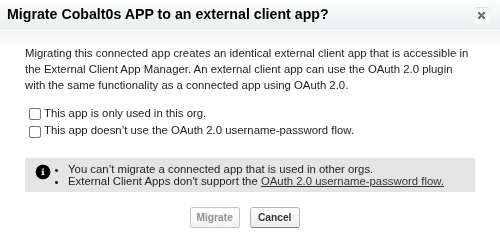 3. Click **Migrate**.
 4. Click **OK**.
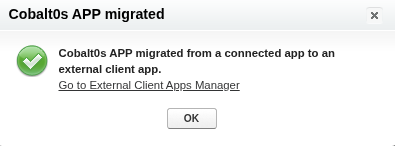 5. A **confirmation message** will appear.
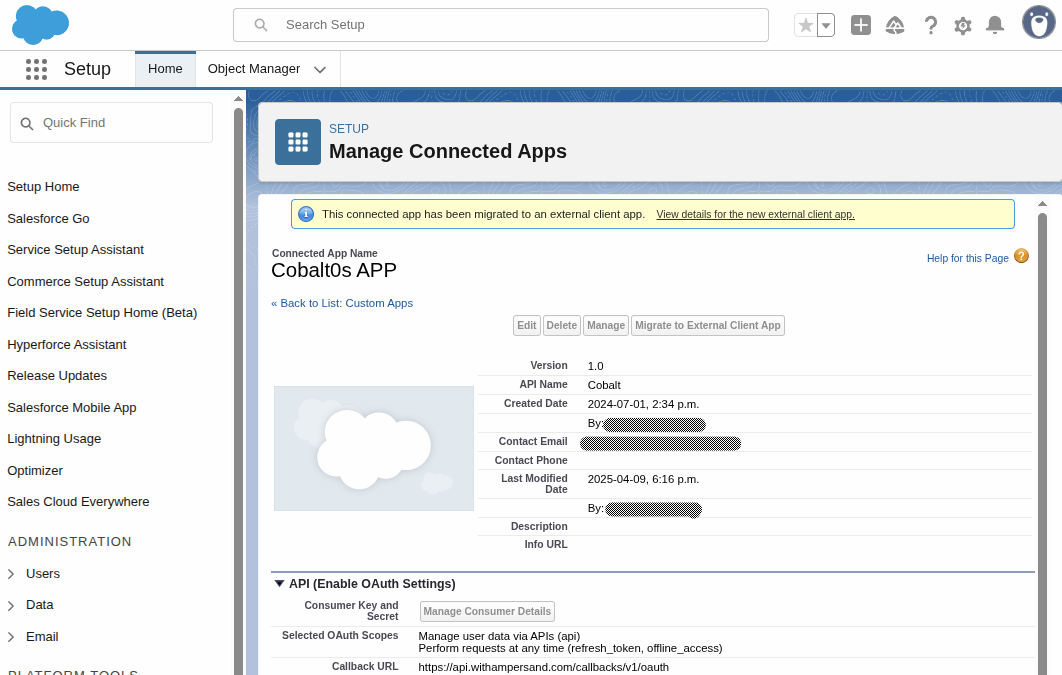 6. Open **External Client App Manager**.
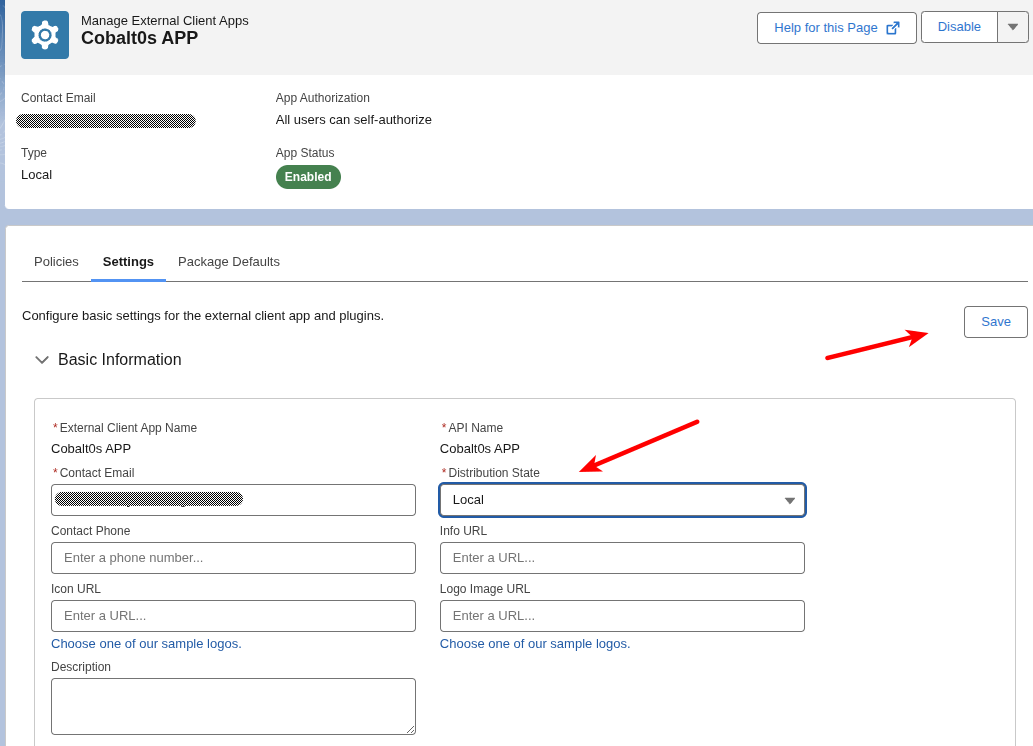
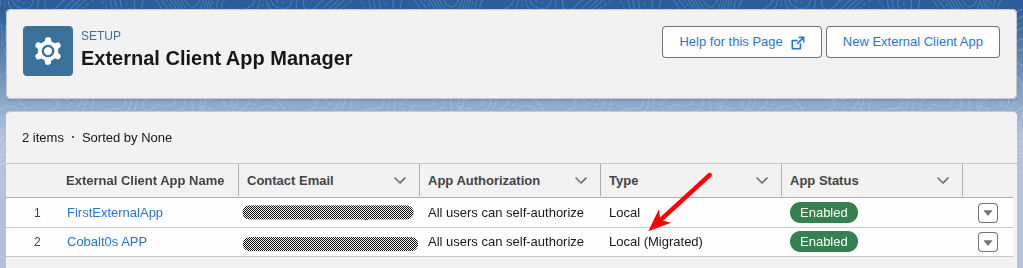 7. Select your app, go to the **Settings** tab and set "Distribution State" to **Packaged**.
 8. Go to the Policies tab, expand “OAuth Policies”, and click the edit button. In the “App Authorization” box, make the following modifications:
* In “Refresh Token Policy”, select “Refresh token is valid until revoked”
* In “IP Relaxation”, select “Relax IP restrictions”
9. [Enable Dev Hub](#1-enable-dev-hub) on your Salesforce org that is hosting the Connected App (which is now an External Client App).
10. Create a new Developer Edition Salesforce org and [register a namespace](#2-register-a-namespace), then [link the namespace](#3-link-namespace-to-dev-hub-org) to the Dev Hub Org.
11. Package the External Client App by [following these instructions](#5-package-the-external-client-app).
## Using the connector
To start integrating with Salesforce:
* Create a manifest file like the [example](https://github.com/amp-labs/samples/blob/main/salesforce/amp.yaml).
* Deploy it using the [amp CLI](/cli/overview).
* If you are using Read Actions or Subscribe Actions, create a [destination](/destinations).
* Embed the [InstallIntegration](/embeddable-ui-components#install-integration) UI component.
* Start using the connector!
* If your integration has [Read Actions](/read-actions) or [Subscribe Actions](/subscribe-actions), you'll start getting webhook messages.
* If your integration has [Write Actions](/write-actions), you can start making API calls to our Write API.
* If your integration has [Proxy Actions](/proxy-actions), you can start making Proxy API calls.
## Customer guide
The [Salesforce customer guide](/customer-guides/salesforce) is a guide that can be shared with your customers to help them be successful in using your integration.
## Troubleshooting
For common errors and how to resolve them, see the [Salesforce troubleshooting guide](/troubleshooting-guides/salesforce).
8. Go to the Policies tab, expand “OAuth Policies”, and click the edit button. In the “App Authorization” box, make the following modifications:
* In “Refresh Token Policy”, select “Refresh token is valid until revoked”
* In “IP Relaxation”, select “Relax IP restrictions”
9. [Enable Dev Hub](#1-enable-dev-hub) on your Salesforce org that is hosting the Connected App (which is now an External Client App).
10. Create a new Developer Edition Salesforce org and [register a namespace](#2-register-a-namespace), then [link the namespace](#3-link-namespace-to-dev-hub-org) to the Dev Hub Org.
11. Package the External Client App by [following these instructions](#5-package-the-external-client-app).
## Using the connector
To start integrating with Salesforce:
* Create a manifest file like the [example](https://github.com/amp-labs/samples/blob/main/salesforce/amp.yaml).
* Deploy it using the [amp CLI](/cli/overview).
* If you are using Read Actions or Subscribe Actions, create a [destination](/destinations).
* Embed the [InstallIntegration](/embeddable-ui-components#install-integration) UI component.
* Start using the connector!
* If your integration has [Read Actions](/read-actions) or [Subscribe Actions](/subscribe-actions), you'll start getting webhook messages.
* If your integration has [Write Actions](/write-actions), you can start making API calls to our Write API.
* If your integration has [Proxy Actions](/proxy-actions), you can start making Proxy API calls.
## Customer guide
The [Salesforce customer guide](/customer-guides/salesforce) is a guide that can be shared with your customers to help them be successful in using your integration.
## Troubleshooting
For common errors and how to resolve them, see the [Salesforce troubleshooting guide](/troubleshooting-guides/salesforce).