> ## Documentation Index
> Fetch the complete documentation index at: https://docs.withampersand.com/llms.txt
> Use this file to discover all available pages before exploring further.
# Attio
## What's Supported
### Supported Actions
This connector supports:
* [Read Actions](/read-actions), including full historic backfill and incremental read.
* [Write Actions](/write-actions).
* [Proxy Actions](/proxy-actions), using the base URL `https://api.attio.com`.
### Supported Objects
The Attio connector supports reading to the following objects:
* [People](https://docs.attio.com/rest-api/endpoint-reference/standard-objects/people/list-person-records)
* [Companies](https://docs.attio.com/rest-api/endpoint-reference/standard-objects/companies/list-company-records)
* [Users](https://docs.attio.com/rest-api/endpoint-reference/standard-objects/users/list-user-records)
* [Deals](https://docs.attio.com/rest-api/endpoint-reference/standard-objects/deals/assert-a-deal-record)
* [Workspaces](https://docs.attio.com/rest-api/endpoint-reference/standard-objects/workspaces/assert-a-workspace-record)
* [Lists](https://docs.attio.com/rest-api/endpoint-reference/lists/list-all-lists)
* [WorkspaceMembers](https://docs.attio.com/rest-api/endpoint-reference/workspace-members/list-workspace-members)
* [Notes](https://docs.attio.com/rest-api/endpoint-reference/notes/list-notes)
* [Tasks](https://docs.attio.com/rest-api/endpoint-reference/tasks/list-tasks)
* [Custom objects](https://docs.attio.com/rest-api/endpoint-reference/records/list-records)
The Attio connector supports writing to the following objects:
* [People](https://docs.attio.com/rest-api/endpoint-reference/standard-objects/people/list-person-records)
* [Companies](https://docs.attio.com/rest-api/endpoint-reference/standard-objects/companies/list-company-records)
* [Users](https://docs.attio.com/rest-api/endpoint-reference/standard-objects/users/list-user-records)
* [Deals](https://docs.attio.com/rest-api/endpoint-reference/standard-objects/deals/assert-a-deal-record)
* [Workspaces](https://docs.attio.com/rest-api/endpoint-reference/standard-objects/workspaces/assert-a-workspace-record)
* [Lists](https://docs.attio.com/rest-api/endpoint-reference/lists/list-all-lists)
* [WorkspaceMembers](https://docs.attio.com/rest-api/endpoint-reference/workspace-members/list-workspace-members)
* [Notes](https://docs.attio.com/rest-api/endpoint-reference/notes/list-notes)
* [Tasks](https://docs.attio.com/rest-api/endpoint-reference/tasks/list-tasks)
* [Custom objects](https://docs.attio.com/rest-api/endpoint-reference/records/list-records)
### Example integration
For an example manifest file of an Attio integration, visit our [samples repo on Github](https://github.com/amp-labs/samples/blob/main/attio/amp.yaml).
## Before You Get Started
To connect Attio with Ampersand, you will need [an Attio Account](https://app.attio.com/auth/sign-in).
Once your account is created, you'll need to create an app in Attio and obtain the following credentials from your app:
* Client ID
* Client Secret
You will then use these credentials to connect your application to Ampersand.
### Create an Attio Account
Here's how you can sign up for an Attio account:
* Go to the [Attio Sign Up page](https://app.attio.com/auth/sign-in).
* Sign up using your preferred method.
### Creating an Attio App
Follow the steps below to create an Attio app and add the Ampersand redirect URL.
1. Log in to your [Attio](https://build.attio.com/auth/login) account.
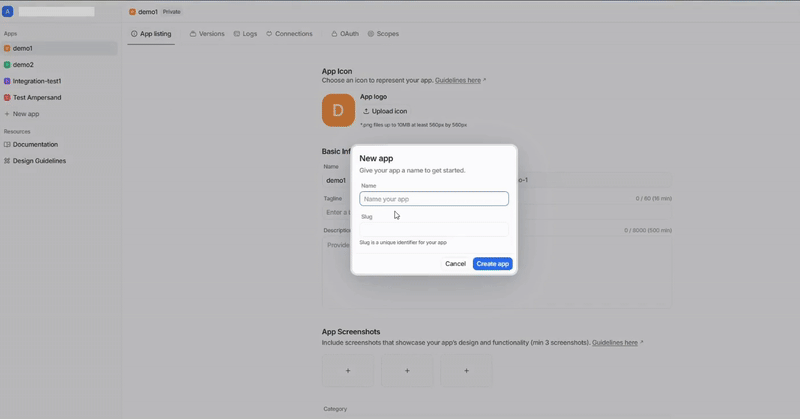
2. Click on **New app** to open the **New app** dialog.
3. Enter a name for the application in the **name** section and click **Create app**.
4. Navigate to the **OAuth** section and enable **OAuth** switch to view the Client ID and Client Secret.
5. In the **Redirect URIs** section, click **New redirect URI**, add the Ampersand Redirect URI: `https://api.withampersand.com/callbacks/v1/oauth`.
6. Click **Configure scopes**, enable the necessary scopes, and click Save changes.
 ## Add Your Attio App Info to Ampersand
1. Log in to your [Ampersand Dashboard](https://dashboard.withampersand.com).
2. Select the project where you want to create an Attio integration.
## Add Your Attio App Info to Ampersand
1. Log in to your [Ampersand Dashboard](https://dashboard.withampersand.com).
2. Select the project where you want to create an Attio integration.
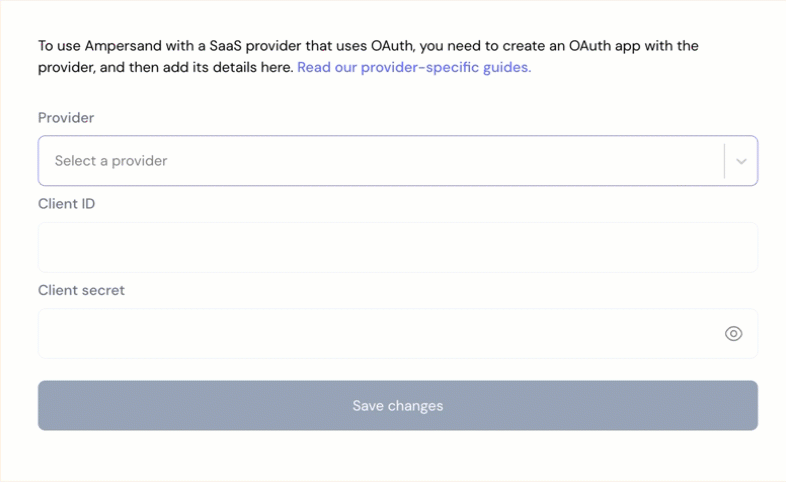
 3. Select **Provider Apps**.
4. Select *Attio* from the **Provider** list.
5. Enter the previously obtained *Client ID* in the **Client ID** field and the *Client Secret* in the **Client Secret** field.
3. Select **Provider Apps**.
4. Select *Attio* from the **Provider** list.
5. Enter the previously obtained *Client ID* in the **Client ID** field and the *Client Secret* in the **Client Secret** field.
 6. Click **Save Changes**.
## Using the connector
To start integrating with Attio:
* Create a manifest file using the [example](https://github.com/amp-labs/samples/blob/main/attio/amp.yaml).
* Deploy it using the [amp CLI](/cli/overview).
* If you are using Read Actions, create a [destination](/destinations).
* Embed the [InstallIntegration](/embeddable-ui-components#install-integration) UI component.
* Start using the connector!
* If your integration has [Read Actions](/read-actions), you'll start getting webhook messages.
* If your integration has [Write Actions](/write-actions), you can start making API calls to our Write API.
* If your integration has [Proxy Actions](/proxy-actions), you can start making Proxy API calls.
6. Click **Save Changes**.
## Using the connector
To start integrating with Attio:
* Create a manifest file using the [example](https://github.com/amp-labs/samples/blob/main/attio/amp.yaml).
* Deploy it using the [amp CLI](/cli/overview).
* If you are using Read Actions, create a [destination](/destinations).
* Embed the [InstallIntegration](/embeddable-ui-components#install-integration) UI component.
* Start using the connector!
* If your integration has [Read Actions](/read-actions), you'll start getting webhook messages.
* If your integration has [Write Actions](/write-actions), you can start making API calls to our Write API.
* If your integration has [Proxy Actions](/proxy-actions), you can start making Proxy API calls.